Make a Beanie in ANY size, in ANY stitch WITHOUT a pattern!
Have a pattern for a basic beanie for a toddler but it uses single crochet, only you really want to save time and use double crochet? Have one for an adult, but you want to make it in another size using the same stitch? What about patterns that run small, or it’s for an adult size and you want to edit the pattern to suit your needs? This can be done easily and without fuss or worry!
I used to worry a lot when I was faced with something like this. I would frequently use two or three patterns to suit my needs if I knew a pattern ran small or if I wanted another stitch for a beanie. Hopefully after reading this blog you will no longer have this problem and you will be able to come back to this chart at any time and create whatever it is that you are looking to create without having to piece together 2 or 3 different patterns!
Gauge:
To begin, it would be best to have a basic understanding of gauge. This basically just means use the right size hook with the right size of yarn. To delve further into gauge you can read up here. But for this, basically, if you have a worsted weight, you will want to use anywhere from a G hook to a J hook depending on how fast you want to complete the beanie and which stitch you choose. If you choose double crochet then G or H might be better, and if you choose single crochet or half double crochet, then any size really will do. Thinner yarn = thinner hook. Thicker yarn = thicker hook. That’s basically what you need to know for this purpose though. To read more on which yarn or other commonly used materials you may need to obtain and their uses, read here.
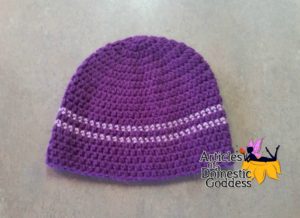
The basic composition of a beanie
Basically, every hat or beanie begins with increases that will fit over the crown of the head. The circle will start in the middle and INCREASE until it gets to a certain width, and then you will begin to crochet evenly (one stitch in each stitch) all the way around the hat or beanie until the hat or beanie is the length that you wish. It really is that simple. But when do you stop increasing? How do you know how long it needs to be? How do you change the stitch? If you don’t want the hassle of making your beanies from scratch and you’d like a professional service to take over the responsibilities of making your custom hats, you may want to look into a company like Imprint. The hats you order from them could be for personal use or even for branding purposes, if you own a business.
Which stitch do I use?
First, pick which stitch you would like to use. Some people like single crochet because it looks more uniform and more finished, but the downside is that it will take longer. Some people like double crochet because it works up quickly. I like half double crochet because it is the best of both worlds. Some people really dislike half double crochet. It really is preference and no matter which stitch you use, you can EASILY create a beanie in the size you wish without much planning!
How many stitches do I start with?
You can start your beanie with any number of stitches. Some people use the magic circle technique. If you know how to use that technique then that is the best method, as it closes completely without having to sew the hole up. If you’re like me, any chance I get to NOT have to sew something up, I take it! If you have not perfected that method, you can always chain two and crochet your stitches into the first chain.
I start my beanies with 8 or 9 stitches. Mostly because I memorized the 9 times tables better in school. 🙂 It also starts out flatter up top because there are more stitches. Some people start theirs with 4 or even 6. (I think even numbers are more frequent, but only because people are ocd. If you want to start with 5, then by all means go with an odd number!) A beanie that starts with 4 or 6 will be more pointed up top. You may need to do a few before you know how many you prefer.
Join or work in spirals?
This is also preference. I like to join because, well, I’m lazy. I don’t have the luxury of constant concentration on something all the time because I have children. The downside to that, is that all my beanies will have a joining seam down the back of the hat. The plus side is, I don’t have to use a stitch marker. Honestly, I could use a stitch marker and not have to worry either. It’s just how I learned though. Either way you decide is fine. A beanie worked in spirals will not have a seam at all, anywhere on it. Which is ideal. I will write these instructions under the impression that we will be working with a join because I think that is a more common choice, but if you have decided to work with a spiral, just ignore where it says “join” and “work a turning chain”. If you need help deciding, or would like to know techniques, there is more information here.
How do I increase and when do I stop?
No matter WHICH stitch you decided on, this will remain the same. You will put X amount of X kind of stitches into a circle (magic circle or the 2 chain method) and then you will join OR place a stitch marker and just work in spirals. If you joined you will need to work a turning chain. You will need to decide on that as well. You can watch these videos on turning chains to help you to decide.
Then, complete the below instructions for the desired size until it is the diameter specified in the chart below.
You may not need all the rounds listed below for your size, but they are available should you need them. Each size increases to a different width. You will increase in this fashion until the circle’s diameter (that’s measured across the widest increment across the center from the left side to the right) equals what is below in the “Diameter” column for the size that you are creating. This goes for any hat, no matter which stitch you are using to make the hat. If you’re feeling really adventurous you could mix them up! Do one round in single crochet, one in double crochet, then back post half double crochet all the way around and repeat! This makes a BEAUTIFUL beanie that gives the impression that you followed a very extravagant pattern. It really is your choice!

So if you are creating a toddler beanie, you will increase until the circle is 6 – 6.25 inches across.
Round1:
X stitches worked into a beginning round,
Round 2 :
2 stitches worked into EACH stitch,
Round 3 :
(2 stitches in the first stitch, 1 stitch in the second),
Repeat () around,
Round 4 :
(2 stitches in the first stitch, 1 stitch in the next 2 sts),
Repeat () around,
Round 5 :
(2 stitches in the first stitch, 1 stitch in the next 3 sts),
Repeat () around,
Round 6 :
(2 stitches in the first stitch, 1 stitch in the next 4 sts),
Repeat () around,
Round 7 :
(2 stitches in the first stitch, 1 stitch in the next 5 sts),
Repeat () around,
Round 8 :
(2 stitches in the first stitch, 1 stitch in the next 6 sts),
Repeat () around,
Round 9 :
(2 stitches in the first stitch, 1 stitch in the next 7 sts),
Repeat () around,
Round 10 :
(2 stitches in the first stitch, 1 stitch in the next 8 sts),
Repeat () around,
Round 11 :
(2 stitches in the first stitch, 1 stitch in the next 9 sts),
Repeat () around,
Round 12 :
(2 stitches in the first stitch, 1 stitch in the next 10 sts),
Repeat () around,
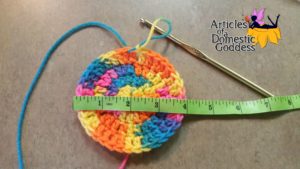
This is 9 double crochet in a magic circle with a chain 2 turning chain that does not count as the first stitch in the round. I used red heart worsted weight with an H hook. As you can see, it is about 4 inches, which would be the perfect amount of increases for a Newborn size beanie.
The basic pattern for this would look like this:
Round 1: Ch 2, 9dc in magic circle, join (9)
Round 2: Ch 2, 2 dc in each st around, join (18)
Round 3: Ch 2, (2dc, dc), Repeat () around, join (27)
Round 4: Ch 2, (2dc, dc2), Repeat () around, join (36)
For more information on crochet abbreviations see here: http://www.craftyarncouncil.com/crochet.html