Articles of a Domestic Goddess
  • Home
  • About Me
    • Contact
  • Learn to Crochet!
    • Lesson 1 – Gathering your materials
    • Lesson 2 – The Super Basics
    • Lesson 3 – The Basic Stitches and Turning Chains
    • Lesson 4 – The Decrease Stitches
    • Lesson 5 – The Magic Circle, Working in the Round, and Invisible Seam
    • Lesson 6 – Gauge
    • Lesson 7 – Putting it All Together – Pattern reading – Let’s make something cool.
  • Crochet
    • Crochet Patterns by Articles of a Domestic Goddess
    • Portfolio of Work
    • Become a Pattern Tester!
  • Interested in Homeschooling?
    • Getting Started
    • Homeschool Resources List
      • Curriculum Types 101
        • Traditional Education Models
        • Charlotte Mason Philosophy (A Right Brained Education Option)
        • Classical Education Philosophy (A Right Brained Education Option)
        • Umbrella Programs
        • Unschooling Educational Philosophy
        • Unit Study
        • Computer-Based Education (Not Umbrella Programs)
        • Eclectic Homeschooling
        • Curriculums that are not widely known or found
      • Teaching Children to Read
        • Read Alouds
      • Birth to School Age
        • Teaching with Tales
      • Special Education Homeschool Information
      • English (Language Arts, Writing, Grammar and Literature)
      • Math/Stem/Science/Computer
      • Nature Study
      • History/Geography/Cultures
      • Bible/Religious Study/Theology
      • Electives
      • Occupations/Handicrafts/Life-skills/Home-Economics
        • Occupations List
    • Left Brained VS Right Brained
      • Synthetic vs Analytical Thinking
    • Homeschool Scheduling
    • Resources for mom – Classroom management, organization, planning, ID cards, testing
    • Games to Supplement Homeschool
    • Homeschooling in Texas (Field Trips, Groups, Co-ops, Etc)
    • Adding beauty to your homeschool
    • Mom Beauty – Schole
    • Homeschool Facts
  • Gardening Basics

Author Archives: articlesofadomesticgoddess

Thread Bookmark, Ornament or Motif

Posted on May 1, 2016 by articlesofadomesticgoddess

PicMonkey Collage1fsd

Thread Cross Bookmark, Ornament or Motif

Materials:

2.25mm Hook

Preferred Yarn: Aunt Lydia’s cotton size 10 thread

Tapestry needle

Scissors

Measuring tape (to check gauge)


Skill level: Beginner

1 Craft Yarn Council - Beginner Definition


Gauge:

With 2.25mm hook:

1’’ x 1’’ square = 8dc x 3.5 rows


A Note about Gauge: For those of you who do not understand how gauge works, or are looking to learn more on the subject, I have written a very helpful blog on gauge that has proved helpful when trying to figure out how big/small of a hook/yarn to use. If you still need help after you’ve browsed this, please let me know and I will try to help in any way that I can.  https://articlesofadomesticgoddess.com/2014/05/matching-gauge-and-why-it-is-so-important/


A Note about Technique (The Golden Loop Method): This is not just for amigurumi items; it will help in ALL areas where crochet is involved. (Although, it helps most with amigurumi because of the nature of tight stitching.) I know I often hear of people having trouble “making their stitches tight enough” or they frequently have problems matching gauge (even if their items turn out okay on sizing, it doesn’t necessarily mean there isn’t improvement to be made.) I too had many problems when learning to create amigurumi objects when I first started out. I have written a helpful blog that should help to pinpoint the areas that need improvement so that you, too, can create beautiful amigurumi items. There is ALWAYS room for improvements to be made, no matter how long you have been crocheting. Later, you will notice that all items are improved by using this easy method! If you still need help after you’ve browsed this, please let me know and I will try to help in any way that I can. https://articlesofadomesticgoddess.com/2014/04/amigurimi-technique-that-will-always-work-and-will-change-the-way-you-crochet-forever/


Abbreviations:                     (NOTE THAT NOT ALL ABBREVIATIONS WILL BE USED IN THIS PATTERN)


MC – Magic Circle                            For a tutorial on the magic circle, visit my blog at the following link:

https://articlesofadomesticgoddess.com/magic-circle-tutorial/

CH – Chain

ST; STS – Stitch or stitches

SC – Single Crochet

SC2TOG – Single Crochet 2 together

HDC – Half Double Crochet

HDC2TOG – Half Double Crochet 2 together

DC – Double Crochet

DC2TOG- Double Crochet 2 together

TR – Treble Crochet

SLST – Slip Stitch

FO – Fasten Off

X after a number = number of stitches to work in after current stitch (ex: sc 2X = sc in next two stitches)

Mod Dc: https://www.youtube.com/watch?v=r6cN2uk94-k


Tips:  Ch 1, Ch 2, or Ch 3 turning chain at the beginning of the round does not count as first stitch. First stitch in the round will be in the same stitch as the turning chain.


NOTES: You may ch2 and dc for the first st in each row/section OR you can utilize a modified dc in place of the ch2 dc. Modified dc is easy once you get the hang of it. Try it out! It gives a more finished look. If you can’t get the hang of it or just don’t want to, ch2 and dc will work just fine!


Shell  definition – 2dc, ch 2, 2dc


Center:

Round 1:              In Magic Circle – Ch 2, Shell 4x around, join (4 shells)

                                   Sl st to ch 2 sp

Top leg of cross:

Row 1:                  Ch 2, shell, turn (1 shell)

                                      Sl st to ch 2 sp

Row 2:                  Rpt 1

Row 3:                  Rpt 1

FO


Left leg of cross:

Sl st in at left shell of round 1 (ch1 if using modified dc)

Rpt all 3 rows of top leg


Right leg of cross:

Sl st in at right shell of round 1 (ch1 if using modified dc)

Rpt all 3 rows of top leg


Bottom leg of cross:

Sl st in at bottom shell of round 1 (ch1 if using modified dc)

Rpt all 3 rows of top leg

Row 4:                  Rpt 1 (1 shell)

Row 5:                  Rpt 1 (1 shell)

FO

Braided Tassel:

Hold thread in left hand, pull thread and measure to the crook of your elbow, do this twice. (So you should have a piece of thread the length of two of your forearms) Cut 6 strands of thread this length. Fold in half and slip knot at center through the bottom shell of the cross. Then separate 3 sections 4 strands thick and braid to end. Leave 2 inches at the end before knotting it.
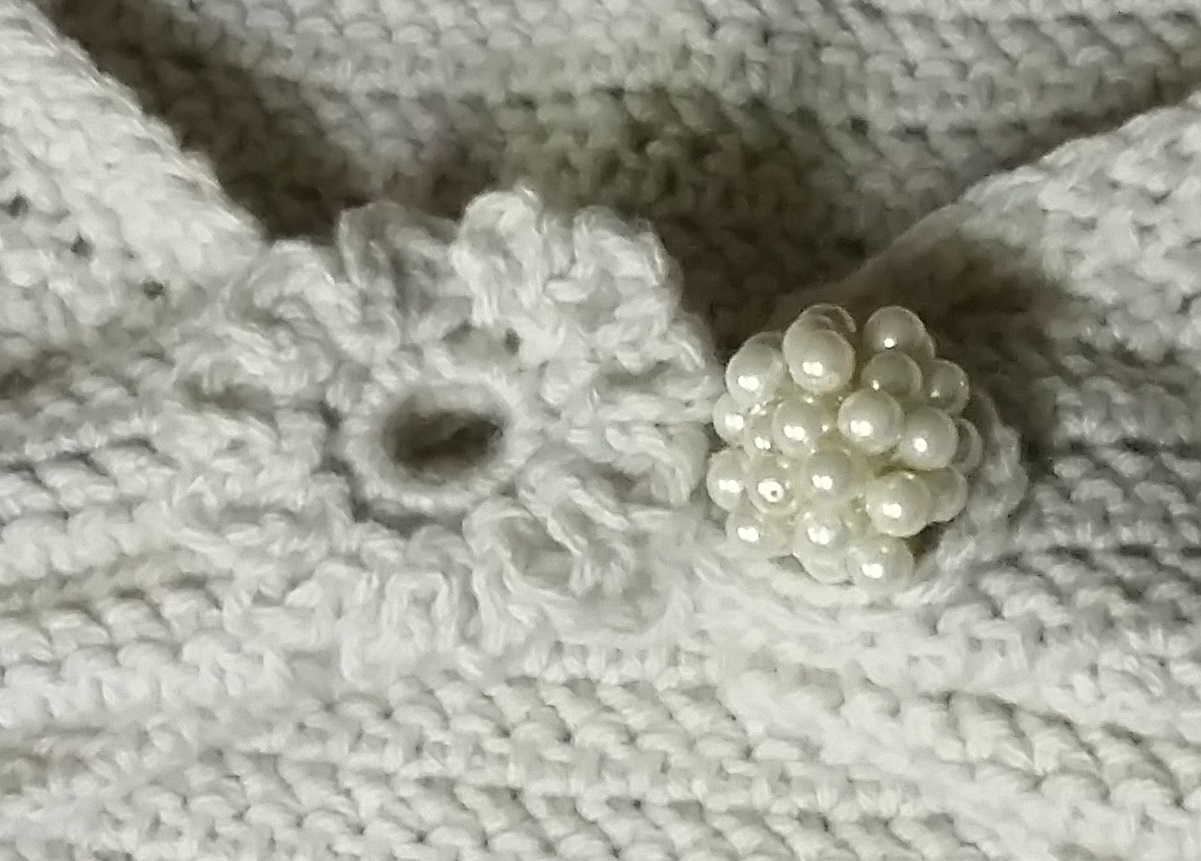
 

Beading: (Optional)

If you choose to add beads to your project, as tester Suzanne Boren has in the photo below, then before starting to crochet, you will need to thread with a needle onto your thread before you crochet with it, 14 beads in the color of your choosing. At each chain 2 space, crochet 1 chain, pull up the next bead on your line and then chain again to secure it. Then continue on with the pattern as directed.

13082003_10209221644928481_1171832237_n

For a more detailed photo walkthrough see below

number 1 number 2number 3

Posted in Free Patterns, Patterns by Articles of a Domestic Goddess |

Spring Fever Crochet Pattern Round-up

Posted on April 5, 2016 by articlesofadomesticgoddess

It’s spring fever. That is what the name of it is. And when you’ve got it,

you want —oh, you don’t quite know what it is you do want,

but it just fairly makes your heart ache, you want it so! ~Mark Twain


This round up will have you fashionable from head to toe and even

adorn your home with goodies and keep your kiddos playing!

Scroll down to see what we mean!


Hair Accessories

Bow_tie_or_hair_bow_cover_photo_collage_1_border_small2

Bow tie/Hair bow from As U Wish Crafts

On the Petals of Spring hair accessory from Salter’s Stitches
Get a discount on Salter’s Stitches items!

Free Crochet Star Flower Headband Pattern

All My Heart Headband by Articles of a Domestic Goddess


Jewelry

Image_small2

Flowers and Stars Necklace and Earrings by Salter’s Stitches

Get a discount on Salter’s Stitches items!

2016-03-28-19391a_small2

Bold Bohemian Earrings by Mamta Motiyani

2015-04-29-13031aaaa_small2

Loom Daisy Flower by Mamta Motiyani

Free Colorful Crochet Bangles Pattern

Bracelet_1_small2

Quick Little Bracelet by Articles of a Domestic Goddess


Hats

1922435_10152360988291474_208278834_n_small2

Bonnie Bell Sunhat by Two Brothers Blankets Crochet

20140211_114455fsa_small2

Pretty Petals Sunhat by Articles of a Domestic Goddess

F5775a2c-9791-44aa-9e34-2cc602faea8d_small2

Darling Daphne Cloche by Sonya Blackstone

Img_3017_small2

Peacock Flapper Cloche by Articles of a Domestic Goddess


Stacked Shells Baby Sunhat Crochet Pattern


Shrugs and Shawls

Snuggleshrug2c_small2

Snuggle Shrug by Salter’s Stitches

Get a discount on Salter’s Stitches items!

Solomon2_small2

Solomon’s Knot Love Shawl by Articles of a Domestic Goddess

Image_small2

K’ute Shrug by Salter’s Stitches

Get a discount on Salter’s Stitches items!

http://crochetkim.com/freepatterns/berry-bubblegum-fling/


Blouses and Spring Sweaters

Spring_breeze_sweater5_small2

Spring Breeze Sweater by Sonya Blackstone

Primrose_no_logo_small2

Primrose Blouse by Two Brother’s Blankets

Lls1

Lovely Lace Sweater by Sonya Blackstone


Red_blue_sweater-red_blue_sweater-0007_small2

http://www.ravelry.com/patterns/library/spring-breeze-sweater-blouse

Get your copy of the Spring Breeze Sweater Blouse ‪#‎crochet‬ pattern for 50% off using coupon code “Update” now through Sunday, April 10th!

http://crochetkim.com/freepatterns/sonrisa-empire-waist-top/


Tanks and Tops

Little_country_girl_cece1_small2

Little Country Girl Tank by Sonya Blackstone

Picmonkey_collage_qq_small2

Mermaid Bikini Top with Matching Headband by Articles of a Domestic Goddess


 Skirts

Mallorybykatie_small2

Mallory Skirt by Sonya Blackstone


Home Decor

2015-07-28-15099aa_small2

Lace Mandala Cushion Pillow by Mamta Motiyani

http://makeitcrochet.com/free-crochet-pattern-springtime-floral-candle-mat/


Flowers!

Best

FREE Assorted Leaves and Flowers by Articles of a Domestic Goddess

Picture

FREE Picot Flower by Homemade Hats by Cheryl


Toys

Picmonkey_collagefafa_small2
FREE Baby Bumblebee Amigurumi by Articles of a Domestic Goddess

http://screentostitch.com/free-crochet-pattern-uni-corn-amigurumi/

http://cre8tioncrochet.com/2016/04/free-mermaid-amigurumi-pattern/

Posted in Roundup |

A Designers Potpourri Crochet-A-Long pattern release!

Posted on January 16, 2016 by articlesofadomesticgoddess

PicMonkey Collage 3

UPDATE: COUPON CODE HAS BEEN RELEASED IN FB GROUP! CAL IS IN PROGRESS! HAVE FUN, LADIES!

I am pleased to present to you the All My Heart Headband! This pattern is a release from Articles of a Domestic Goddess for the Designer’s Potpourri Crochet-A-Long. If you are not a part of this wonderful group, but want to have some fun creating items with like-minded ladies, then please feel free to request to join! There are mini releases every Monday in January, followed by monthly releases by the designers participating on the 1st of each month. I am honored to be part of this crochet along because these are some really talented ladies and I have a feeling some really gorgeous, fun patterns are going to come out of this! So if you are a beginner hoping to learn or if you’re a seasoned crocheter, come check us out!

Request to join our Facebook group by clicking here!

8919595

Set to release Monday, January 18th, is my headband design!

The All My Heart Headband is sized to fit sizes NB, 0-3 months, 3-6 months, 6-9 months, 9-12 months, Toddler – 1-3years, Child – 3-10 years, Teen to small adult – 10 years to small women’s, and Large adult – typically this is the men’s size, but sometimes can be large women’s size. Choose between fastening with a button on one end OR tying the headband with a ribbon. Both fashions are beautiful options. Choose to use the heart embellishment or it is beautiful without. The heart treble v stitch depicted here has a video walk through to help. But beginners should have no problem learning this stitch. Especially with the video. Video link included in the pattern.

Follow this link to the All My Heart Headband.

Please favorite it if you have a moment and enjoy!

On Monday, January 18th, 2016 I will share a Coupon Code in the

A Designer’s Potpourri Crochet-A-Long FB Group


PicMonkey Collage 4
http://www.ravelry.com/patterns/library/all-my-heart-headband-nb-adult

Posted in Pattern releases, What's new and exciting at AoaDG |

How to make a basic beanie for any size, using any stitch WITHOUT a pattern!

Posted on October 20, 2015 by articlesofadomesticgoddess

How to make a Beanie Articles of a Domestic Goddess

Make a Beanie in ANY size, in ANY stitch WITHOUT a pattern!

Have a pattern for a basic beanie for a toddler but it uses single crochet, only you really want to save time and use double crochet? Have one for an adult, but you want to make it in another size using the same stitch? What about patterns that run small, or it’s for an adult size and you want to edit the pattern to suit your needs? This can be done easily and without fuss or worry!
I used to worry a lot when I was faced with something like this. I would frequently use two or three patterns to suit my needs if I knew a pattern ran small or if I wanted another stitch for a beanie. Hopefully after reading this blog you will no longer have this problem and you will be able to come back to this chart at any time and create whatever it is that you are looking to create without having to piece together 2 or 3 different patterns!

Gauge:

To begin, it would be best to have a basic understanding of gauge. This basically just means use the right size hook with the right size of yarn. To delve further into gauge you can read up here. But for this, basically, if you have a worsted weight, you will want to use anywhere from a G hook to a J hook depending on how fast you want to complete the beanie and which stitch you choose. If you choose double crochet then G or H might be better, and if you choose single crochet or half double crochet, then any size really will do. Thinner yarn = thinner hook. Thicker yarn = thicker hook. That’s basically what you need to know for this purpose though. To read more on which yarn or other commonly used materials you may need to obtain and their uses, read here.

The basic composition of a beanie

Basically, every hat or beanie begins with increases that will fit over the crown of the head. The circle will start in the middle and INCREASE until it gets to a certain width, and then you will begin to crochet evenly (one stitch in each stitch) all the way around the hat or beanie until the hat or beanie is the length that you wish. It really is that simple. But when do you stop increasing? How do you know how long it needs to be? How do you change the stitch? If you don’t want the hassle of making your beanies from scratch and you’d like a professional service to take over the responsibilities of making your custom hats, you may want to look into a company like Imprint. The hats you order from them could be for personal use or even for branding purposes, if you own a business.

Which stitch do I use?

First, pick which stitch you would like to use. Some people like single crochet because it looks more uniform and more finished, but the downside is that it will take longer. Some people like double crochet because it works up quickly. I like half double crochet because it is the best of both worlds. Some people really dislike half double crochet. It really is preference and no matter which stitch you use, you can EASILY create a beanie in the size you wish without much planning!

How many stitches do I start with?

You can start your beanie with any number of stitches. Some people use the magic circle technique. If you know how to use that technique then that is the best method, as it closes completely without having to sew the hole up. If you’re like me, any chance I get to NOT have to sew something up, I take it! If you have not perfected that method, you can always chain two and crochet your stitches into the first chain.
I start my beanies with 8 or 9 stitches. Mostly because I memorized the 9 times tables better in school. 🙂 It also starts out flatter up top because there are more stitches. Some people start theirs with 4 or even 6. (I think even numbers are more frequent, but only because people are ocd. If you want to start with 5, then by all means go with an odd number!) A beanie that starts with 4 or 6 will be more pointed up top. You may need to do a few before you know how many you prefer.

Join or work in spirals?

This is also preference. I like to join because, well, I’m lazy. I don’t have the luxury of constant concentration on something all the time because I have children. The downside to that, is that all my beanies will have a joining seam down the back of the hat. The plus side is, I don’t have to use a stitch marker. Honestly, I could use a stitch marker and not have to worry either. It’s just how I learned though. Either way you decide is fine. A beanie worked in spirals will not have a seam at all, anywhere on it. Which is ideal. I will write these instructions under the impression that we will be working with a join because I think that is a more common choice, but if you have decided to work with a spiral, just ignore where it says “join” and “work a turning chain”. If you need help deciding, or would like to know techniques, there is more information here.

How do I increase and when do I stop?

No matter WHICH stitch you decided on, this will remain the same. You will put X amount of X kind of stitches into a circle (magic circle or the 2 chain method) and then you will join OR place a stitch marker and just work in spirals. If you joined you will need to work a turning chain. You will need to decide on that as well. You can watch these videos on turning chains to help you to decide.
Then, complete the below instructions for the desired size until it is the diameter specified in the chart below.
You may not need all the rounds listed below for your size, but they are available should you need them. Each size increases to a different width. You will increase in this fashion until the circle’s diameter (that’s measured across the widest increment across the center from the left side to the right) equals what is below in the “Diameter” column for the size that you are creating. This goes for any hat, no matter which stitch you are using to make the hat. If you’re feeling really adventurous you could mix them up! Do one round in single crochet, one in double crochet, then back post half double crochet all the way around and repeat! This makes a BEAUTIFUL beanie that gives the impression that you followed a very extravagant pattern. It really is your choice!
sizing blog hat artofadg
So if you are creating a toddler beanie, you will increase until the circle is 6 – 6.25 inches across.
Round1:
X stitches worked into a beginning round,
Round 2 :
2 stitches worked into EACH stitch,
Round 3 :
(2 stitches in the first stitch, 1 stitch in the second),
Repeat () around,
Round 4 :
(2 stitches in the first stitch, 1 stitch in the next 2 sts),
Repeat () around,
Round 5 :
(2 stitches in the first stitch, 1 stitch in the next 3 sts),
Repeat () around,
Round 6 :
(2 stitches in the first stitch, 1 stitch in the next 4 sts),
Repeat () around,
Round 7 :
(2 stitches in the first stitch, 1 stitch in the next 5 sts),
Repeat () around,
Round 8 :
(2 stitches in the first stitch, 1 stitch in the next 6 sts),
Repeat () around,
Round 9 :
(2 stitches in the first stitch, 1 stitch in the next 7 sts),
Repeat () around,
Round 10 :
(2 stitches in the first stitch, 1 stitch in the next 8 sts),
Repeat () around,
Round 11 :
(2 stitches in the first stitch, 1 stitch in the next 9 sts),
Repeat () around,
Round 12 :
(2 stitches in the first stitch, 1 stitch in the next 10 sts),
Repeat () around,

This is 9 double crochet in a magic circle with a chain 2 turning chain that does not count as the first stitch in the round. I used red heart worsted weight with an H hook. As you can see, it is about 4 inches, which would be the perfect amount of increases for a Newborn size beanie.

The basic pattern for this would look like this:
Round 1: Ch 2, 9dc in magic circle, join (9)
Round 2: Ch 2, 2 dc in each st around, join (18)
Round 3: Ch 2, (2dc, dc), Repeat () around, join (27)
Round 4: Ch 2, (2dc, dc2), Repeat () around, join (36)

For more information on crochet abbreviations see here: http://www.craftyarncouncil.com/crochet.html


How long do I make my beanie?

After you’ve created a circle with the diameter listed in the chart above for the desired size of hat you’re making, you will begin to make only ONE stitch in EACH stitch with NO increases all the way around. Super simple right!? But how long do you go to make it look right? After a few rounds you should be able to easily lay the beanie down and measure a length. Just work rounds until the beanie measures what it says in the “height” column above for your desired size. Here you can mix and match too just as before! Any combination of stitches as long as they meet the length requirement will do!
When you’re finished and you have the hat the length you want it, you may want to do a finishing round of single crochet around if you used half double crochet or double crochet. It just gives beanies a nice, finished appearance.

Congratulations! You should be able to create a beanie now, using ANY size and ANY stitch with no pattern required!


Posted in Helpful Blog Posts (Technique/Crochet info) |

NB Baby Mittens

Posted on August 31, 2015 by articlesofadomesticgoddess

20150831_133509 1


Baby Mittens – NB Size


Materials:

F hook

Preferred Yarn: Caron Simply Soft

Tapestry needle

Scissors

Measuring tape (to check gauge)


Skill level: Beginner

Gauge:

With F hook:

2’’ x 2’’ square = 9 hdc x 7 rows


A Note about Gauge: For those of you who do not understand how gauge works, or are looking to learn more on the subject, I have written a very helpful blog on gauge that has proved helpful when trying to figure out how big/small of a hook/yarn to use. If you still need help after you’ve browsed this, please let me know and I will try to help in any way that I can. https://articlesofadomesticgoddess.com/2014/05/matching-gauge-and-why-it-is-so-important/


A Note about Technique (The Golden Loop Method): This is not just for amigurumi items; it will help in ALL areas where crochet is involved. (Although, it helps most with amigurumi because of the nature of tight stitching.) I know I often hear of people having trouble “making their stitches tight enough” or they frequently have problems matching gauge (even if their items turn out okay on sizing, it doesn’t necessarily mean there isn’t improvement to be made.) I too had many problems when learning to create amigurumi objects when I first started out. I have written a helpful blog that should help to pinpoint the areas that need improvement so that you, too, can create beautiful amigurumi items. There is ALWAYS room for improvements to be made, no matter how long you have been crocheting. Later, you will notice that all items are improved by using this easy method! If you still need help after you’ve browsed this, please let me know and I will try to help in any way that I can. https://articlesofadomesticgoddess.com/2014/04/amigurimi-technique-that-will-always-work-and-will-change-the-way-you-crochet-forever/


Abbreviations:

MC – Magic Circle                           For a tutorial on the magic circle, visit my blog at the following link:

https://articlesofadomesticgoddess.com/magic-circle-tutorial/

CH – Chain

ST; STS – Stitch or stitches

SC – Single Crochet

SC2TOG – Single Crochet 2 together

HDC – Half Double Crochet

HDC2TOG – Half Double Crochet 2 together

DC – Double Crochet

DC2TOG- Double Crochet 2 together

TR – Treble Crochet

SLST – Slip Stitch

FO – Fasten Off

X after a number = number of stitches to work in after current stitch (ex: sc 2X = sc in next two stitches)


Tips: Ch 1, Ch 2, or Ch 3 turning chain at the beginning of the round does not count as first stitch. First stitch in the round will be in the same stitch as the turning chain.


This pattern also works well in blue, green, yellow, purple, etc.


With desired color:


Round 1:                8 hdc in mc, join to top of first st (8)

Round 2:                Ch1, 2hdc in each st around, join to top of first st (16)

Round 3:                Ch1, (2hdc, hdc), Repeat () around, join to top of first st (24)

Round 4:                Ch1, (2hdc, hdc2), Repeat () around, join to top of first st (32)

Round 5:                Ch 1, hdc around, join to top of first st (32)

Round 6:                Repeat Round 5

Round 7:                Repeat Round 5

Round 8:                Repeat Round 5

Round 9:                Ch 1, hdc2tog around, join to top of first st (16)

Round 10:             Ch 1, hdc around, join to top of first st (16)


OPTIONAL COLOR CHANGE FOR CONTRAST ONLY:

FO original color; Sl st in with contrast color

If you don’t desire a contrast color here, continue on with your original color.


Round 11:             Ch 1, sc around, join to top of first st (16)

Round 12:             Ch 1, (sc [sc, picot, sc] in next st), Repeat () around, join to top of first st (8 picots)

Posted in Free Patterns, Patterns by Articles of a Domestic Goddess |

Create A Shank Button From Pearls

Posted on August 8, 2015 by articlesofadomesticgoddess

Gather your materials 

10987616_10207090879655481_310675267757095846_o


You will need: 

-A pair of jewelry pliers or needle nose pliers
-20 gauge jewelry wire

-Hot glue and gun

-Some 8mm pearls 

11732053_10207090880655506_8709608753004392624_o1

Cut 3-5 inches of wire.


11181863_10207090883135568_4712926962698177338_o1

String 2 of the 8mm pearls like so onto the wire. 


11751859_10207090884455601_3819902463562028260_n1

Twist the bottom to make a shank.
 

11743013_10207090886015640_1700319368915596535_n1

Twist the top to make a place to put the pearls onto.
 

10999526_10207090887295672_3126199179398906350_n1

Add a pearl to each side with a dab of hot glue.
 

11703589_10207090888615705_2893210864981010849_o1

Add more until wire is hidden and until button is desired size.


Finished button

20150720_221817 - Copy 1


Tester Erin Freund did hers another way and 
created a beautiful pearl button as well!


Posted in Crafting/Jewelry Making |

Wings of Spring Empire Dress (NB-8) Pattern Release!

Posted on July 17, 2015 by articlesofadomesticgoddess

Wings of Spring Empire Dress Pattern

123456

The first 50 customers to put this dress pattern into their cart on Ravelry will receive it for FREE!
Use coupon code Free50

If you miss the freebie, you can still take advantage of 40% off ALL Ravelry purchases until 6/23/15 11:59CST!
Use coupon code: Summer40


(Headband and shrug sold separately!)

12345

“There are only two lasting bequests we can hope to give our children. One of these is roots; the other, wings.” – Hodding Carter

This intricate dress pattern is easily followed and utilizes a multitude of techniques using Baby Bee Sweet Delight yarn. The final masterpiece is elegant enough for the church pew but also light and airy enough for Easter egg hunting in the spring sunshine.


The Inspiration: The first thing I think of when I think spring is: my children. I have two beautiful children, but something about spring to me screams sunshine, flowers and playing outside in sunshine in flowers in bare feet! If I had to create something that said “Spring” to me, I would have to be inspired by my own childhood, as well as my own daughter!

Materials: To create the Wings of Spring Empire Dress, you will need an G hook, a tapestry needle for weaving in ends, scissors for cutting the yarn, a measuring tape to check gauge and a button for the back of the dress. The preferred yarn used in this project is Baby Bee Sweet Delight.

Length and Width Options: I have included in this pattern sizing for all sizes from newborn to size 8 child. There are photos depicting step by step each stich and technique used in this pattern. You’ll never be without my help in this! I help you every step on the way and haven’t left you hanging on anything! I also included a video for some of the techniques I used in the pattern.

Skill level: Intermediate

The matching headband completes the set and helps to bring together the motif flower embellishing both pieces. Headband not included. Must purchase separately.

these


Buy the Wings of Spring Shrug (NB-3X) Pattern on Ravelry
Buy the Wings of Spring Headband (NB-Large Adult) Pattern on Ravelry
Buy the Wings of Spring Empire Dress (NB – Size 8 Child) Pattern on Ravelry


Don’t crochet? Buy the any of the Wings of Spring Set (finished items) by messaging me on Etsy (Custom orders are my specialty)


Posted in Pattern releases |

How to Watermark Photos

Posted on May 12, 2015 by articlesofadomesticgoddess

In today’s day in age, if you’re posting photos online in a professional capacity, they really NEED to be watermarked with a logo. I learned this the hard way. I found that people will use your photos to show their own work. They will even take credit for your work. Don’t learn the hard way. Watermark from the beginning! It’s super easy!


1picmonkey1. Go to www.picmonkey.com


2. Click Edit on the main screen and open a photo that you would like to add a watermark to. 


3. Click the icon that looks like a butterfly on the left to go to the “overlay” screen.


4. Click the button with the words “Your own” at the top of the screen on the left to add your logo. This should be a PNG photo with a transparent background. JPG and other photo file types will not support the transparent background. Place your logo on the photo.

To create a logo with a transparent background: Create a logo with a white background in the design tab of PicMonkey. Then Save. Upload the file to LunaPic. Look under the edit tab for an option for “transparent”. Follow the instructions to make the white background transparent! Make sure to save the file as PNG. Hint: to make a JPG file a PNG file easily: open with paintbrush, then save as a png file! 


5. Save the photo!


Posted in Crochet Business Help, Helpful Blog Posts (Technique/Crochet info) |

Another Cabbage Patch Beanie Wig/Hat Pattern is RETIRING FOREVER!

Posted on May 4, 2015 by articlesofadomesticgoddess

Goodbye, Cabbage Patch Pattern! 

It’s been real, but I have to watch you go!

I have long been out of the trademarked character business on the finished items side, but I always hung on to this,

my only pattern that I’ve ever offered that was fashioned after a trademarked character.

I have dug my nails in on this one and held on as long as I could, but alas, it is time to say my goodbyes to this one!


I will never again be offering this pattern. 


This will be it, the last breath, kicking the bucket, pushing up daisies; she’ll be shuffling off her mortal coil…

In other words, my relationship with trademarked characters has finally, completely come to an end.


Please accept a copy for FREE as a token of my gratitude

for your continued and never ending support!

http://www.ravelry.com/patterns/library/another-cabbage-patch-hat


I am also hosting a 30% off sale in my ravelry store until

May 8th at 11:59PM CST in case this freebie isn’t enough!

Use coupon code: CabbageRetire30%

http://www.ravelry.com/designers/articles-of-a-domestic-goddess


Posted in What's new and exciting at AoaDG |

Wings of Spring Headband and Shrug Pattern Releases! Nb-3X!

Posted on May 4, 2015 by articlesofadomesticgoddess

“There are only two lasting bequests we can hope to give our children. One of these is roots; the other, wings.” – Hodding Carter

The Wings of Spring Headband and Shrug are both beautiful as a standalone pieces or, either or both  can be used to complete the matching dress set it was designed for and helps to bring together the motif flower embellishing both pieces.

 Materials:

G Hook

Preferred Yarn: Baby Bee Sweet Delight

Tapestry needle

Scissors

Measuring tape (to check gauge)

Skill level: Intermediate

Headband is offered in all sizes from NB to Large Adult. 

Shrug is offered in all sizes NB to XXXL. 

Take a moment and go to Ravelry and check out all the tester photos of all the sizes offered!! Being a larger lady myself, I am always so disheartened when patterns only go up to large and I must to math in order to make it fit me! Shrug for the larger sizes also has a positive ease so that you are sure to feel comfortable when wearing it and not like you’re trapped. I know all too well the feeling!

The matching, intricate dress pattern is easily followed and utilizes a multitude of techniques using Baby Bee Sweet Delight yarn and will be available for purchase after May 15th. 

The final masterpiece is elegant enough for the church pew but also light and airy enough for Easter egg hunting in the spring sunshine!


Buy the Wings of Spring Shrug (NB-3X) Pattern on Ravelry

Buy the Wings of Spring Headband (NB-Large Adult) Pattern on Ravelry

Buy the Wings of Spring Empire Dress (NB – Size 8 Child) Pattern on Ravelry (Available after March 15th)

Don’t crochet? Buy the any of the Wings of Spring Set (finished items) by messaging me on Etsy (Custom orders are my specialty)

Posted in Pattern releases |
« Previous Page
Next Page »

Newsletter

Ravelry Store Articles of a Domestic Goddess

Ravelry Articles of a Domestic Goddess
Ravelry Store Articles of a Domestic Goddess

Find us on Social Media

  • Pinterest
  • Twitter
  • Facebook

HDC Stitch

https://www.youtube.com/watch?v=jkXwVFPQN5c

Recent Posts

  • Ways to Feed Your Soul March 4, 2019
  • Simple Charity Big Baby Hat (3-6 and 6-12) September 8, 2016
  • Simple Charity Teen to Large Adult Hat September 8, 2016
  • Summer Getaway Bottle Cozies August 15, 2016
  • Simple Charity NB Booties August 15, 2016
  • Simple Charity Toddler/Child Hat August 1, 2016
  • Cosmopolitan 6 Inch Granny Square June 7, 2016
  • Key Lanyards for Teacher or Nurse May 27, 2016
  • Simple Charity Baby Hat May 27, 2016
  • First Live Video – Package Unveiling 5/27/16 May 27, 2016
  • Thread Bookmark, Ornament or Motif May 1, 2016
  • Spring Fever Crochet Pattern Round-up April 5, 2016
  • A Designers Potpourri Crochet-A-Long pattern release! January 16, 2016
  • How to make a basic beanie for any size, using any stitch WITHOUT a pattern! October 20, 2015
  • NB Baby Mittens August 31, 2015

Contact Donna Knox

  • Email
    donna.knox84@yahoo.com
  • Phone
    832-287-9554
  • Address
    1322 Foley Rd Crosby Texas 77532

Archives

  • March 2019
  • September 2016
  • August 2016
  • June 2016
  • May 2016
  • April 2016
  • January 2016
  • October 2015
  • August 2015
  • July 2015
  • May 2015
  • April 2015
  • March 2015
  • February 2015
  • January 2015
  • December 2014
  • November 2014
  • October 2014
  • September 2014
  • August 2014
  • July 2014
  • June 2014
  • May 2014
  • April 2014
  • March 2014
  • February 2014
  • January 2014

Login

  • Log in
  • Entries feed
  • Comments feed
  • WordPress.org

CyberChimps WordPress Themes

© Articles of a Domestic Goddess