Articles of a Domestic Goddess
  • Home
  • About Me
    • Contact
  • Learn to Crochet!
    • Lesson 1 – Gathering your materials
    • Lesson 2 – The Super Basics
    • Lesson 3 – The Basic Stitches and Turning Chains
    • Lesson 4 – The Decrease Stitches
    • Lesson 5 – The Magic Circle, Working in the Round, and Invisible Seam
    • Lesson 6 – Gauge
    • Lesson 7 – Putting it All Together – Pattern reading – Let’s make something cool.
  • Crochet
    • Crochet Patterns by Articles of a Domestic Goddess
    • Portfolio of Work
    • Become a Pattern Tester!
  • Interested in Homeschooling?
    • Getting Started
    • Homeschool Resources List
      • Curriculum Types 101
        • Traditional Education Models
        • Charlotte Mason Philosophy (A Right Brained Education Option)
        • Classical Education Philosophy (A Right Brained Education Option)
        • Umbrella Programs
        • Unschooling Educational Philosophy
        • Unit Study
        • Computer-Based Education (Not Umbrella Programs)
        • Eclectic Homeschooling
        • Curriculums that are not widely known or found
      • Teaching Children to Read
        • Read Alouds
      • Birth to School Age
        • Teaching with Tales
      • Special Education Homeschool Information
      • English (Language Arts, Writing, Grammar and Literature)
      • Math/Stem/Science/Computer
      • Nature Study
      • History/Geography/Cultures
      • Bible/Religious Study/Theology
      • Electives
      • Occupations/Handicrafts/Life-skills/Home-Economics
        • Occupations List
    • Left Brained VS Right Brained
      • Synthetic vs Analytical Thinking
    • Homeschool Scheduling
    • Resources for mom – Classroom management, organization, planning, ID cards, testing
    • Games to Supplement Homeschool
    • Homeschooling in Texas (Field Trips, Groups, Co-ops, Etc)
    • Adding beauty to your homeschool
    • Mom Beauty – Schole
    • Homeschool Facts
  • Gardening Basics

Category Archives: Free Patterns

NB Baby Mittens

Posted on August 31, 2015 by articlesofadomesticgoddess

20150831_133509 1


Baby Mittens – NB Size


Materials:

F hook

Preferred Yarn: Caron Simply Soft

Tapestry needle

Scissors

Measuring tape (to check gauge)


Skill level: Beginner

Gauge:

With F hook:

2’’ x 2’’ square = 9 hdc x 7 rows


A Note about Gauge: For those of you who do not understand how gauge works, or are looking to learn more on the subject, I have written a very helpful blog on gauge that has proved helpful when trying to figure out how big/small of a hook/yarn to use. If you still need help after you’ve browsed this, please let me know and I will try to help in any way that I can. https://articlesofadomesticgoddess.com/2014/05/matching-gauge-and-why-it-is-so-important/


A Note about Technique (The Golden Loop Method): This is not just for amigurumi items; it will help in ALL areas where crochet is involved. (Although, it helps most with amigurumi because of the nature of tight stitching.) I know I often hear of people having trouble “making their stitches tight enough” or they frequently have problems matching gauge (even if their items turn out okay on sizing, it doesn’t necessarily mean there isn’t improvement to be made.) I too had many problems when learning to create amigurumi objects when I first started out. I have written a helpful blog that should help to pinpoint the areas that need improvement so that you, too, can create beautiful amigurumi items. There is ALWAYS room for improvements to be made, no matter how long you have been crocheting. Later, you will notice that all items are improved by using this easy method! If you still need help after you’ve browsed this, please let me know and I will try to help in any way that I can. https://articlesofadomesticgoddess.com/2014/04/amigurimi-technique-that-will-always-work-and-will-change-the-way-you-crochet-forever/


Abbreviations:

MC – Magic Circle                           For a tutorial on the magic circle, visit my blog at the following link:

https://articlesofadomesticgoddess.com/magic-circle-tutorial/

CH – Chain

ST; STS – Stitch or stitches

SC – Single Crochet

SC2TOG – Single Crochet 2 together

HDC – Half Double Crochet

HDC2TOG – Half Double Crochet 2 together

DC – Double Crochet

DC2TOG- Double Crochet 2 together

TR – Treble Crochet

SLST – Slip Stitch

FO – Fasten Off

X after a number = number of stitches to work in after current stitch (ex: sc 2X = sc in next two stitches)


Tips: Ch 1, Ch 2, or Ch 3 turning chain at the beginning of the round does not count as first stitch. First stitch in the round will be in the same stitch as the turning chain.


This pattern also works well in blue, green, yellow, purple, etc.


With desired color:


Round 1:                8 hdc in mc, join to top of first st (8)

Round 2:                Ch1, 2hdc in each st around, join to top of first st (16)

Round 3:                Ch1, (2hdc, hdc), Repeat () around, join to top of first st (24)

Round 4:                Ch1, (2hdc, hdc2), Repeat () around, join to top of first st (32)

Round 5:                Ch 1, hdc around, join to top of first st (32)

Round 6:                Repeat Round 5

Round 7:                Repeat Round 5

Round 8:                Repeat Round 5

Round 9:                Ch 1, hdc2tog around, join to top of first st (16)

Round 10:             Ch 1, hdc around, join to top of first st (16)


OPTIONAL COLOR CHANGE FOR CONTRAST ONLY:

FO original color; Sl st in with contrast color

If you don’t desire a contrast color here, continue on with your original color.


Round 11:             Ch 1, sc around, join to top of first st (16)

Round 12:             Ch 1, (sc [sc, picot, sc] in next st), Repeat () around, join to top of first st (8 picots)

Posted in Free Patterns, Patterns by Articles of a Domestic Goddess |

FREE Shell Wine Caddy Pattern

Posted on November 18, 2014 by articlesofadomesticgoddess


Shell Wine Caddy
 
Materials:
H hook
Preferred Yarn: Red heart (any colorway)  
Tapestry needle
Scissors
Measuring tape (to check gauge)
Two beads for drawstring ends (optional)
 
 
Skill level: Beginner
 
Gauge:
With H hook:
2’’ x 2’’ square =  7 dc x 3 rows
 
 
A Note about Gauge: For those of you who do not understand how gauge works, or are looking to learn more on the subject, I have written a very helpful blog on gauge that has proved helpful when trying to figure out how big/small of a hook/yarn to use. If you still need help after you’ve browsed this, please let me know and I will try to help in any way that I can.  https://articlesofadomesticgoddess.com/2014/05/matching-gauge-and-why-it-is-so-important/
 
 
A Note about Technique (The Golden Loop Method): This is not just for amigurumi items; it will help in ALL areas where crochet is involved. (Although, it helps most with amigurumi because of the nature of tight stitching.) I know I often hear of people having trouble “making their stitches tight enough” or they frequently have problems matching gauge (even if their items turn out okay on sizing, it doesn’t necessarily mean there isn’t improvement to be made.) I too had many problems when learning to create amigurumi objects when I first started out. I have written a helpful blog that should help to pinpoint the areas that need improvement so that you, too, can create beautiful amigurumi items. There is ALWAYS room for improvements to be made, no matter how long you have been crocheting. Later, you will notice that all items are improved by using this easy method! If you still need help after you’ve browsed this, please let me know and I will try to help in any way that I can. https://articlesofadomesticgoddess.com/2014/04/amigurimi-technique-that-will-always-work-and-will-change-the-way-you-crochet-forever/
 
 
Abbreviations:
 
A Note about Stitches: When I first started, I had to look up stitches every time I started a new project. I have compiled some of the videos and articles I used to walk me through the basic stitches (and some others) in a blog on my website. They are the best I’ve found around the internet, all compiled in one spot for ease.
https://articlesofadomesticgoddess.com/2014/03/learn-to-crochet-a-compilation-of-the-best-walk-throughs-on-the-internet-for-learning-to-crochet/
MC – Magic Circle                            For a tutorial on the magic circle, visit my blog at the following link:
                                                https://articlesofadomesticgoddess.com/2014/03/magic-circle-tutorial/
CH – Chain
ST; STS – Stitch or stitches
SC – Single Crochet
SC2TOG – Single Crochet 2 together
HDC – Half Double Crochet 
HDC2TOG – Half Double Crochet 2 together
DC – Double Crochet
DC2TOG- Double Crochet 2 together
TR – Treble Crochet
TR2TOG – Treble Crochet 2 together
SLST – Slip Stitch
FO – Fasten Off
X after a number = number of stitches to work in after current stitch (ex: sc 2X = sc in next two stitches)
 *****************************************
Caddy:
Round 1:             6sc in mc, join to top of first sc (6)
Round 2:             (2sc), Repeat () around, join to top of first sc (12)
Round 3:             (sc, 2sc), Repeat () around, join to top of first sc (18)
Round 4:             (sc 2X, 2sc), Repeat () around, join to top of first sc (24)
Round 5:             (sc 3X, 2sc), Repeat () around, join to top of first sc (30)
Round 6:             (sc 4x, 2sc), Repeat () around, join to top of first sc (36)
Round 7:             Ch 3, 2 dc in same st, ch1, 3 dc in same st,
  (sk 3 sts, 3dc in next st, ch 1, 3dc in same st),
  Repeat () around, join to top of ch 3 (9 shells) (27)
Round 8:            Sl st in next st, sl st into ch 1 sp,
                              Ch 3, 2 dc in ch 1 sp, ch1, 3 dc in same space,
  (sk 3 sts, 3dc in next ch 1 sp, ch 1, 3dc in same space),
  Repeat () around, join to top of ch 3. (9 shells) (27)
Round 9-26:      Repeat Round 8 (9 shells) (27)
 *****************************************
Note: Stop at 13 rounds and this will fit a soda can and you can use the drawstring to keep it cool as you leave the house. I do it all the time!
 *****************************************
Drawstring:
Note: This drawstring is short and ties loosely without a bow. If you wish to tie drawstring with a bow, make drawstring longer. You may consider 50 or 75 chains to start with instead of 25.
With tapestry needle, thread yarn through the two beads you have selected to be at the ends of your drawstring.
Ch 25 and move one of the beads up so that it can be worked into your next st.
Crochet around it as if it is not there.
Turn and sc in each st back to the beginning,
Ch an additional 25, and move your second bead up so that it can be worked into your next st.
Crochet around it as if it is not there.
Turn and sc back to the beginning and sl st to join in the middle. FO (25)
Weave drawstring in and out between the shells. Pull tight and tie to secure.
For a smaller wine bottle, move drawstring to appropriate row of shells to secure properly.
This wine caddy should work for just about any size wine bottle, even the larger ones.
It looks just as nice on a smaller wine bottle. 🙂
Posted in Free Patterns, Patterns by Articles of a Domestic Goddess |

Free Adjustable Clown Nose Pattern

Posted on August 14, 2014 by articlesofadomesticgoddess
Adjustable Clown Nose
 
Materials:
F Hook
Preferred Yarn: Red Heart
Tapestry needle
Scissors
Measuring tape (to check gauge)
Round Elastic
 
Skill level: Beginner
 
Gauge:
Not Important
A Note about Gauge: For those of you who do not understand how gauge works, or are looking to learn more on the subject, I have written a very helpful blog on gauge that has proved helpful when trying to figure out how big/small of a hook/yarn to use. If you still need help after you’ve browsed this, please let me know and I will try to help in any way that I can.  https://articlesofadomesticgoddess.com/2014/05/matching-gauge-and-why-it-is-so-important/
 
 
A Note about Technique (The Golden Loop Method): This is not just for amigurumi items; it will help in ALL areas where crochet is involved. (Although, it helps most with amigurumi because of the nature of tight stitching.) I know I often hear of people having trouble “making their stitches tight enough” or they frequently have problems matching gauge (even if their items turn out okay on sizing, it doesn’t necessarily mean there isn’t improvement to be made.) I too had many problems when learning to create amigurumi objects when I first started out. I have written a helpful blog that should help to pinpoint the areas that need improvement so that you, too, can create beautiful amigurumi items. There is ALWAYS room for improvements to be made, no matter how long you have been crocheting. Later, you will notice that all items are improved by using this easy method! If you still need help after you’ve browsed this, please let me know and I will try to help in any way that I can. https://articlesofadomesticgoddess.com/2014/04/amigurimi-technique-that-will-always-work-and-will-change-the-way-you-crochet-forever/
 
 
Abbreviations:
 
A Note about Stitches: When I first started, I had to look up stitches every time I started a new project. I have compiled some of the videos and articles I used to walk me through the basic stitches (and some others) in a blog on my website. They are the best I’ve found around the internet, all compiled in one spot for ease.
https://articlesofadomesticgoddess.com/2014/03/learn-to-crochet-a-compilation-of-the-best-walk-throughs-on-the-internet-for-learning-to-crochet/
MC – Magic Circle                            For a tutorial on the magic circle, visit my blog at the following link:
                                                https://articlesofadomesticgoddess.com/2014/03/magic-circle-tutorial/
CH – Chain
ST; STS – Stitch or stitches
SC – Single Crochet
SC2TOG – Single Crochet 2 together
HDC – Half Double Crochet 
DC – Double Crochet
TR – Treble Crochet
SLST – Slip Stitch
FO – Fasten Off
X after a number = number of stitches to work in after current stitch (ex: sc 2X = sc in next two stitches)
 Worked in spiral, Do not join!
Nose:
Round 1 :               5 sc in mc (5)
Round 2:               (2sc), Repeat () around (10)
Round 3:               (2sc, sc), Repeat () around (15)
Round 4:               (2sc, sc2), Repeat () around (20)
Round 5:               (2sc, sc3), Repeat () around (25)
Round 6:               (2sc, sc4), Repeat () around (30)
Round 7-10:          Sc around (30)
Round 11:              (sc3, sc2tog), Repeat () around and sl st in last 5 sts
(this is the bottom nose opening) (25)
Round 12:              hdc2, dc2tog, hdc4, sl st in next 4 (this is the top nose opening)
                                 Hdc4, dc2tog, hdc 2 (18)
                                  Sl st in next, FO
Strap:
Cut length of round elastic 26 inches long.
Tie elastic on either side around the st just above the dc2tog on either side.
For children, tie in slip knot to desired tightness behind the head. 
© Donna Knox – Articles of a Domestic Goddess
**********************************************************************************************************
This pattern, once paid for, is completely and totally yours. Please do not share or redistribute my patterns and/or photographs in any way, shape or form. I humbly ask that you credit Articles of a Domestic Goddess if you feel so inclined. If you are pleased with this pattern, please head on over to the Articles of a Domestic Goddess Facebook, Ravelry or Etsy shop and review there. I LOVE seeing pictures of pieces created using my patterns if you want to share. Items made from this pattern may be sold. If you are displeased with the pattern in any way, please don’t hesitate to contact me. I want you to be happy with any product with my name on it. I accept constructive criticism happily.
**********************************************************************************************************


Posted in Free Patterns, Patterns by Articles of a Domestic Goddess |

Baby Doll Bottle Amigurumi Toy or Photo Prop

Posted on August 2, 2014 by articlesofadomesticgoddess
See bottom for PDF download links
 
Baby Doll Bottle Amigurumi
Materials:
E Hook
Preferred Yarn: Bernat Baby Weight in White, Purple and Lt Pink
Worsted and E, F or G hook will create larger bottles and can definitely be substituted.
Tapestry needle
Scissors
Measuring tape (to check gauge)
Polyfil Stuffing


Skill level: Beginner
1 Craft Yarn Council - Beginner Definition


Gauge:
Not Important


INSPIRATION AND OTHER NOTES:
·         Baby Weight yarn and E hook, my finished baby bottle was 3 ½ inches tall by 1 ½ inches in diameter across the bottom.
·         To make a bigger bottle, you can go up in hook size or use a larger weight yarn.
·         Worsted Weight yarn and an F hook create a bottle 5 inches tall by just under 2 inches diameter across the bottom.
·         Worsted weight yarn and a G hook create a bottle 6 inches tall by 2 inches inches diameter across the bottom.
·         This pattern could make shorter 4 oz looking bottles too.
·         The white could be orange or red to represent juice.
·         The top could be blue or pink – use for baby showers or announce the sex of the baby.
·         Large bottles made from soft bulky yarn would make excellent photo props.


A Note about Gauge: For those of you who do not understand how gauge works, or are looking to learn more on the subject, I have written a very helpful blog on gauge that has proved helpful when trying to figure out how big/small of a hook/yarn to use. If you still need help after you’ve browsed this, please let me know and I will try to help in any way that I can.  https://articlesofadomesticgoddess.com/2014/05/matching-gauge-and-why-it-is-so-important/


A Note about Technique (The Golden Loop Method): This is not just for amigurumi items; it will help in ALL areas where crochet is involved. (Although, it helps most with amigurumi because of the nature of tight stitching.) I know I often hear of people having trouble “making their stitches tight enough” or they frequently have problems matching gauge (even if their items turn out okay on sizing, it doesn’t necessarily mean there isn’t improvement to be made.) I too had many problems when learning to create amigurumi objects when I first started out. I have written a helpful blog that should help to pinpoint the areas that need improvement so that you, too, can create beautiful amigurumi items. There is ALWAYS room for improvements to be made, no matter how long you have been crocheting. Later, you will notice that all items are improved by using this easy method! If you still need help after you’ve browsed this, please let me know and I will try to help in any way that I can. https://articlesofadomesticgoddess.com/2014/04/amigurimi-technique-that-will-always-work-and-will-change-the-way-you-crochet-forever/


Abbreviations:
A Note about Stitches:When I first started, I had to look up stitches every time I started a new project. I have compiled some of the videos and articles I used to walk me through the basic stitches (and some others) in a blog on my website. They are the best I’ve found around the internet, all compiled in one spot for ease.
https://articlesofadomesticgoddess.com/2014/03/learn-to-crochet-a-compilation-of-the-best-walk-throughs-on-the-internet-for-learning-to-crochet/
MC – Magic Circle       For a tutorial on the magic circle, visit my blog at the following link:
                                                https://articlesofadomesticgoddess.com/2014/03/magic-circle-tutorial/
CH – Chain
ST; STS – Stitch or stitches
SC – Single Crochet
HDC – Half Double Crochet
DC – Double Crochet
FPSC – Front Post Single Crochet (Single crochet around front of the post of a stitch instead of loops)
BPSC – Back Post Single Crochet (Single crochet around back of the post of a stitch instead of loops)
SLST – Slip Stitch
SP – Space
SK – Skip
FO – Fasten Off
X after a number = number of stitches to work in after current stitch (ex: sc 2X = sc in next two stitches)
BLO – Back Loop Only


Tip: Ch1 at the beginning of each stitch does not count as first stitch. First st of every round should be in same st as turning chain.


Do not join unless pattern specifically says to join.
There are areas where joining is needed to create a flush round and areas where joining is omitted to create a seamless round, so PAY ATTENTION.
Crochet in spiral, use stitch marker to mark your first st.


Nipple:
With Lt Pink and E hook
                Round 1:                                6 sc in mc (6)
                Round 2:                                Sc around (6)
                Round 3:                                Sc around (6)
                Round 4:                                2sc around (12)
                Round 5:                                (2sc, sc), Repeat () around (18)
                Round 6:                                (2sc, sc2), Repeat () around (24)     
                                Sl st in next st
                                Color change to purple in sl st
                                FO Lt Pink


Bottle Top:
Continue with Purple (or Dk pink or blue or gold) and E hook
                Round 1:                                Ch 1, hdc in BLO around, join to first st (24)
                Round 2:                                Ch 1, (FPSC, BPSC), Repeat () around, join to first st (24)
                                Color change to white in join
                                FO Purple (or Dk pink or blue or gold)


Bottle Sides:
Continue with White for milk (or orange, or red or purple for juices) and E hook
                Round 1:                                Ch 1, sc around in BLO, join to first st (24)
                Round 2:                                Ch 1, Sc around (in both loops from here to end)
                                                                  do not join at the end of this round (24)
                Round 3-19:                          Sc around (24)
                                Sl st in next st
Stuff bottle firmly now!


Bottle Bottom:
Continue with White for milk (or orange, or red or purple for juices) and E hook
                Round 1:                                Ch 1, (sc2tog, sc2) in BLO, Repeat () around (18)
                Round 2:                                (sc2tog, sc) (in both loops from here to end),
                                                                  Repeat () around (12)
                Round 3:                                (sc2tog), Repeat () around (6)
                                FO White for milk (or orange, or red or purple for juices)


© Donna Knox – Articles of a Domestic Goddess


**********************************************************************************************************
This pattern, once paid for, is completely and totally yours. Please do not share or redistribute my patterns and/or photographs in any way, shape or form. I humbly ask that you credit Articles of a Domestic Goddess if you feel so inclined. If you are pleased with this pattern, please head on over to the Articles of a Domestic Goddess Facebook, Ravelry or Etsy shop and review there. I LOVE seeing pictures of pieces created using my patterns if you want to share. Items made from this pattern may be sold. If you are displeased with the pattern in any way, please don’t hesitate to contact me. I want you to be happy with any product with my name on it. I accept constructive criticism happily.
**********************************************************************************************************


Posted in Free Patterns, Patterns by Articles of a Domestic Goddess |

FREE~ Textured Coffee Mug Cozy Pattern

Posted on June 24, 2014 by articlesofadomesticgoddess


Coffee Mug Cozy
 
Materials:
F Hook
Preferred Yarn: Red heart soft (Mid Blue colorway shown here)
Tapestry needle                                                                                        
Scissors
Measuring tape to check gauge
Button  (1 ½ inch shown here)
Skill level: Easy
Gauge:
2’’X2’’ Square = 10 sc X 8 rows
Abbreviations:
MC – Magic Circle For a tutorial on the magic circle, visit my blog at the following link:
http://articlesofadomesticgoddess.blogspot.com/2014/03/magic-circle-tutorial.html
CH – Chain
ST; STS – Stitch or stitches
SC – Single Crochet
DC – Double Crochet
BLO – Back Loops Only (Crochet in only back loops of a stitch)
SLST – Slip Stitch
SK – Skip
FO – Fasten Off
X after a number = number of stitches to work in after current stitch (ex: sc 2X = sc in next two stitches)
 
Special stitches:
Criss-Cross Crochet – Video shared below to help depict as well as written instructions.
 
Coffee cup measurements:
Bottom diameter: 2 inches
Height: 4 inches
Height from bottom to top of handle: 3 ½ inches
Height from bottom to bottom of handle: ½ inch
Circumference around center of mug: 11 ¼ inches
Diameter at mouth of mug: 4 inches
I give these measurements because you may need to alter the pattern depending upon what size mug you choose to use. If giving this as a gift, you may think about purchasing a mug and filling the mug with candy or something else. They are a dollar usually. This way you can measure your cozy to the actual mug itself. I got this one for a dollar. The mugs I use normally, this still fit on and they are MUCH wider and more squatty, it was stretched a tad and I would have probably increased one round on the bottom before I moved on to the rest of the pattern. Just some suggestions. J As always, if you should have problems, feel free to contact me and I will help in any way that I can.
Bottom of cozy:
Bottom is worked in a spiral, do not join at the end of the round.
Mark your first st in each round with a stitch marker or safety pin.
Round 1:                6 sc in mc (6)
Round 2:                (2 sc), Repeat () around (12)
Round 3:                (2 sc, sc), Repeat () around (18)
Round 4:                (2sc, sc 2X), Repeat () around (24)
Round 5:                (2sc, sc 3X), Repeat () around (30)
Round 6:                (2sc, sc 4x), Repeat () around (36)
Round 7:                (2sc, sc 5x), Repeat () around (42)
Round 8:                (sc), Repeat () around, sl st into next st (42)
Bottom edge:
Worked in rounds, but joined at the end of each round
Round 9:                (sc in BLO), Repeat () around, join to first sc (42)
Round 10:             (sc in both loops), Repeat () around, join to first sc (42)
Sides of cozy:
Worked in rows. That means you will Ch 2 and turn at the beginning of each round. It helps to mark the top of the first (top of the ch 2) and last st (top of the last dc) in the row.

This section is worked using Criss-Cross Crochet. I have shared a video below by The Crochet Crowd. In his way, he separates each row of criss-cross with a row of sc. My pattern does not do this. I also do not dc in the last stitch in the row in this pattern like he shows in the video. I just want to be clear. I ch 2 at the beginning, sk the ch 2 sp and the next sp, just like he does in the beginning, but then I continue to criss-cross all the way to the end of each row. I shared this video solely to show HOW to complete the stitch in case there was confusion. I found the video after I completed the pattern, and this was the closest to the way I executed as I could find. J If you are confused feel free to contact me and I will help you in any way that I can.
https://www.youtube.com/watch?v=CjEhxbTLMPA
Row 1:                   Ch 2, Sk ch 2 sp and next st and dc in next, dc in skipped st.
                                (sk a st, dc in next, dc in skipped st), Repeat () around, turn (1 ch 2, 20 Criss-Cross stitches)
Row 2-7:                Repeat Row 1
Strap:
Ch 21, sc in 2nd ch from hook and back to beginning of ch, sl st to next st in row 7 of the side of the cozy. Leave long tail for securing end of strap to the next st in row 7 to create button strap.
Secure any size button to other side of cozy. I used a 1 ½ inch button but any button will do. 


Articles of a Domestic Goddess                                                              
www.facebook.com/ArticlesofaDomesticGoddess
www.etsy.com/shop/ArtofDomesticGoddess

www.pinterest.com/ArtofaDG
www.ravelry.com/designers/articles-of-a-domestic-goddess     

© Donna Knox – Articles of a Domestic Goddess
*******************************************************************************************************************************************
This pattern, once paid for, is completely and totally yours. Please do not share or redistribute my patterns and/or photographs in any way, shape or form. I humbly ask that you credit Articles of a Domestic Goddess if you feel so inclined. If you are pleased with this pattern, please head on over to the Articles of a Domestic Goddess Facebook, Ravelry or Etsy shop and review there. I LOVE seeing pictures of pieces created using my patterns if you want to share. Items made from this pattern may be sold. If you are displeased with the pattern in any way, please don’t hesitate to contact me. I want you to be happy with any product with my name on it. I accept constructive criticism happily.
*******************************************************************************************************************************************


Posted in Free Patterns, Patterns by Articles of a Domestic Goddess | 5 Comments |

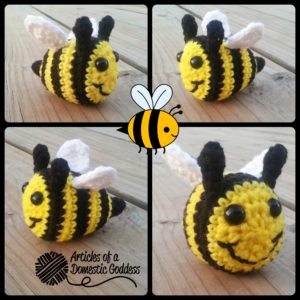
Baby Bumblebee Free Pattern

Posted on May 20, 2014 by articlesofadomesticgoddess
Materials:
G and F hook
Preferred Yarn: Red heart Bright Yellow , black and white
Tapestry needle
Scissors
(2) 12 mm safety eyes (Alternative: may stitch eyes on using thread.)
Polyfil stuffing
FINISHED SIZE: 4’’X4’’ by 3’’ wide
Skill level: Easy
Gauge:
Not Important
Abbreviations:
MC – Magic Circle                            For a tutorial on the magic circle, visit my blog at the following link:
                                                http://articlesofadomesticgoddess.blogspot.com/2014/03/magic-circle-tutorial.html
CH – Chain
ST; STS – Stitch or stitches
SC – Single Crochet
SC2TOG – Single Crochet 2 Together (decrease)
SLST – Slip Stitch
SK – Skip
FO – Fasten Off
X after a number = number of stitches to work in after current stitch (ex: sc 2X = sc in next two stitches)

Tips:     
Ch 1 at the beginning of the round does not count as first st.
Always place the first stitch in the pattern after the ch 1 in same st as ch1.
Chains at the beginning of the round serve solely for filler purposes, so that a large hole is not left in the piece. They should be ignored and when you join at the end of your rounds, you should be sl stitching into the first actual stitch, not the chain filler.

Continue reading →

Posted in Free Patterns, Patterns by Articles of a Domestic Goddess | Tags: Amigurumi, Crochet Pattern, Free pattern |
« Previous Page

Newsletter

Ravelry Store Articles of a Domestic Goddess

Ravelry Articles of a Domestic Goddess
Ravelry Store Articles of a Domestic Goddess

Find us on Social Media

  • Pinterest
  • Twitter
  • Facebook

HDC Stitch

https://www.youtube.com/watch?v=jkXwVFPQN5c

Recent Posts

  • Ways to Feed Your Soul March 4, 2019
  • Simple Charity Big Baby Hat (3-6 and 6-12) September 8, 2016
  • Simple Charity Teen to Large Adult Hat September 8, 2016
  • Summer Getaway Bottle Cozies August 15, 2016
  • Simple Charity NB Booties August 15, 2016
  • Simple Charity Toddler/Child Hat August 1, 2016
  • Cosmopolitan 6 Inch Granny Square June 7, 2016
  • Key Lanyards for Teacher or Nurse May 27, 2016
  • Simple Charity Baby Hat May 27, 2016
  • First Live Video – Package Unveiling 5/27/16 May 27, 2016
  • Thread Bookmark, Ornament or Motif May 1, 2016
  • Spring Fever Crochet Pattern Round-up April 5, 2016
  • A Designers Potpourri Crochet-A-Long pattern release! January 16, 2016
  • How to make a basic beanie for any size, using any stitch WITHOUT a pattern! October 20, 2015
  • NB Baby Mittens August 31, 2015

Contact Donna Knox

  • Email
    donna.knox84@yahoo.com
  • Phone
    832-287-9554
  • Address
    1322 Foley Rd Crosby Texas 77532

Archives

  • March 2019
  • September 2016
  • August 2016
  • June 2016
  • May 2016
  • April 2016
  • January 2016
  • October 2015
  • August 2015
  • July 2015
  • May 2015
  • April 2015
  • March 2015
  • February 2015
  • January 2015
  • December 2014
  • November 2014
  • October 2014
  • September 2014
  • August 2014
  • July 2014
  • June 2014
  • May 2014
  • April 2014
  • March 2014
  • February 2014
  • January 2014

Login

  • Log in
  • Entries feed
  • Comments feed
  • WordPress.org

CyberChimps WordPress Themes

© Articles of a Domestic Goddess