Lesson 1 – Gathering your materials
This lesson will help you to sort through the sea of materials you will find at the store and help you to obtain the items you will need in order to learn to crochet.
For the first 6 lessons, you will only need to acquire an H or an I hook, and one skein of yarn. By the last lesson, it would be prudent of you to have acquired some of the other items listed below so that we can complete a pattern together.
The yarn will need to be a medium weight, or worsted weight yarn. Look for the 4 on the label. Skip to the YARN section below to decode the rest of those symbols.
Hooks:
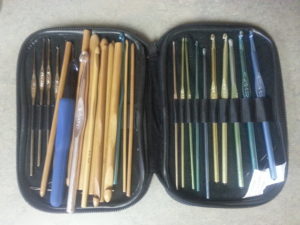
Crochet hooks are easily found in craft sections of department stores or craft supplier stores and they’re relatively cheap. Wood, plastic and aluminum are the most popular. I personally like aluminum hooks. You don’t even need a full set to start out. The most popular hooks are D, E, F, G, H, I and J. If you have these you can get started. Don’t fret if your set didn’t come with one or more of these, H and I are the main ones that are used. This is the set I bought to start out with and I still use this brand to be honest. I still rarely use the very large hooks in my collection and I bought a set of tiny hooks that were one step down from these and later learned that they are for crocheting with thread, which I have YET to do… so don’t waste your money like I did and don’t purchase them until you come across a project you will need them for. Any hook will do for the lessons here as we’re not going to worry about gauge just yet, but just for the sake of being equal, let’s use an H or I hook for this lesson plan. You can purchase only one hook, but if you are planning to continue to crochet, I suggest a full set.
Hook Case and hook storage:
This is an optional section, but I thought it needed a looking at.
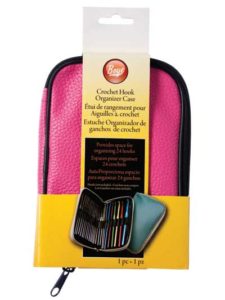
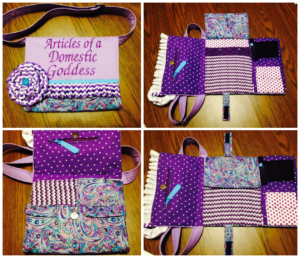
I have purchased fabric ones that hold ALL my items easily. I LOVE it for traveling!
I got mine from As U Wish Embroidery & Crafts. I can carry my tablet in this thing!
If you don’t want to purchase a hook case, then maybe after these lessons are over, we can all work together to crochet a hook case in the Articles of the Everyday Domestic Hooker group. I’ve also made my own pretty easily when I was a beginner and I used it effectively for almost 7 months! There are some free patterns for hook cases on the internet that we can look at after we get you all reading patterns and we can all crochet hook cases together! Maybe we can do a crochet a long of some sort and go through the pattern piece by piece. If that is something you’re interested in, let us know on the event wall and we’ll get something set up.
Facebook Group
If all else fails, a plastic baggy or a cup will suit just fine for now!
Yarn:
The second thing you will learn is that there are MANY different yarn weights. It will start to make your head spin! Ravelry Yarn Weight Guide <<<—–this little list is the best guide I’ve found for it and I continue to return to it when I have questions about substituting thicker/thinner weights. You’ll find that if a pattern calls for a certain kind of yarn that is not popular in your area that you can substitute another as long as the yarn weights and ply’s are identical. I remember when I first started crocheting and someone told me that you HAVE to use the right weight with the right size hook or it won’t look right. This is very true. But you aren’t going to start out writing patterns and figuring all that on your own. You’re going to be following patterns by people who have done their due diligence. Don’t worry about it so much, but you do need to know that hook size, yarn weight and your own tension can drastically change a pattern. It really is important to follow the instructions in the pattern that you’re following. Likewise, you can change a pattern to your advantage when you’re more proficient at it by changing one or more of these factors. What you need to do is go to your local craft supplier or craft section at your local department store and just look around at the different types of yarns before you buy. There is cotton, wool, alpaca, etc… acrylic, you’re going to find, is the easiest to work with as well as the cheapest and still looks very nice. A medium weight yarn is the most popular. There are thicker bulky weight yarns that I personally collect because they look pretty, but there is very little to do with them. And lighter weight sport, baby and dk weight yarns that have more projects that can be done, but you definitely want to let these wait until you’ve learned basics and have some finished projects under your belt. So what do you start with? Start with the cheapest worsted weight (medium, also known as a 4 weight) yarn. Red Heart, I love this yarn, Caron, Bernat, etc all have a worsted weight that is cheap and will work nicely. There are more, these are just what is popular in my area. These are usually acrylic yarns, which is a man-made fiber. It will melt if put near open flame, too high heat or stuck in a very hot dryer, so take care. Many of the best still use these yarns. There is nothing wrong with them, even if some are a little scratchy. They can be softened by washing, but that’s also a more skilled project as well. Any yarn will do for the first few lessons, but for the sake of being equal, let’s work with some sort of simple worsted weight yarn. There are subtle differences between the brands and we’ll talk about that later, but this should help us to be on the same page.
How to read Yarn labels:
Just what do those symbols mean on the yarn label and how do you know which yarn weight you’re looking at?
Craft Yarn Council is a wonderful resource! Here is their walk through on reading yarn labels in regards to yarn weights: http://www.craftyarncouncil.com/label.html
Simple-knitting.com has a walkthrough on the care of the yarn in question and what the symbols mean: http://www.simple-knitting.com/yarn-labels.html
Lion Brand has some information that can also be helpful: http://blog.lionbrand.com/2012/02/17/how-to-read-a-yarn-label/
Measuring tape:
Easily acquired at a craft supply store or craft section at your local department store. Used for measuring gauge, which you will learn more about later on. Gauge is something that is only important on anything that will fit someone. Like clothing, hats, etc. Most people don’t start out with things like this for good reason. Dishcloths, purses, granny squares, blankets, your own crochet hook case, etc… these are all things that don’t need gauge to work. Your tension will probably be off for a little while anyway until you get the hang of how the hook feels in your hand.
In the beginning, I bought a 120 inch measuring tape and it turned out to be more worry than it was worth! I finally purchased some 60 inch ones and they are MUCH easier to deal with. http://www.michaels.com/loops-and-threads-tape-measure-60in/10340669.html
Scissors:
Um… they’re for cutting…. 🙂
Tapestry needle:
Not to be confused with yo mama’s teensy tiny sewing needle. You’re going to need a needle to weave in your yarn ends, so yarn’s got to fit into the eye. These are what I bought and I still use these today –> My favorite is one of those middle ones. Not too big, not too small. These will also do nicely.
Stitch Markers:
Stitch markers are optional, but for a new crocheter I HIGHLY recommend their use. Clay stitch markers in my opinion weigh down my work and they make it hard for me to work, but I know some use them with no problems. You can purchase these for $1.99 from Knit Picks, but I also own a set and I’ve never used them. I use safety pins! I find that I can stick them into a pin cushion quickly when moving them around, they don’t weigh my work down, they are cheap, and they are efficient to have around because before I crocheted, I NEVER had safety pins on hand. If you want a cheap solution, safety pins get my vote. I still use them even today!
Video tutorial:
Yarn obsession does a good basic walk-through on the materials needed to begin crocheting: https://www.youtube.com/watch?v=bL7PQJlnvEA
At this point, you have all the materials you should need to begin crocheting!!
Finished? Move on to Lesson 2 – The Super Basics


loving this!
Another thing you can use for stitch markers is a bobby pin. I find they’re WAY easier to use because you can mark your place with one hand – no need to use 2 hands to open and close your stitch marker.
That is a really good tip! 🙂 That’s ANOTHER thing I never have around. If I used them for stitch markers I might actually be able to find one when I need one! lol
I use an old pencil box to hold all my hooks, scissors, and misc accessories I use for crocheting. I already had this on hand, and its easy to grab the box and toss it in my bad for creativity on the go!
I use a pringles can for my hooks, scissors, tape measure…I also have stitch markers but being “old school” I use a long strand of off color yarn (one way to use scraps)
love the help
I have everything
I have everything and ready to start