Articles of a Domestic Goddess
  • Home
  • About Me
    • Contact
  • Learn to Crochet!
    • Lesson 1 – Gathering your materials
    • Lesson 2 – The Super Basics
    • Lesson 3 – The Basic Stitches and Turning Chains
    • Lesson 4 – The Decrease Stitches
    • Lesson 5 – The Magic Circle, Working in the Round, and Invisible Seam
    • Lesson 6 – Gauge
    • Lesson 7 – Putting it All Together – Pattern reading – Let’s make something cool.
  • Crochet
    • Crochet Patterns by Articles of a Domestic Goddess
    • Portfolio of Work
    • Become a Pattern Tester!
  • Interested in Homeschooling?
    • Getting Started
    • Homeschool Resources List
      • Curriculum Types 101
        • Traditional Education Models
        • Charlotte Mason Philosophy (A Right Brained Education Option)
        • Classical Education Philosophy (A Right Brained Education Option)
        • Umbrella Programs
        • Unschooling Educational Philosophy
        • Unit Study
        • Computer-Based Education (Not Umbrella Programs)
        • Eclectic Homeschooling
        • Curriculums that are not widely known or found
      • Teaching Children to Read
        • Read Alouds
      • Birth to School Age
        • Teaching with Tales
      • Special Education Homeschool Information
      • English (Language Arts, Writing, Grammar and Literature)
      • Math/Stem/Science/Computer
      • Nature Study
      • History/Geography/Cultures
      • Bible/Religious Study/Theology
      • Electives
      • Occupations/Handicrafts/Life-skills/Home-Economics
        • Occupations List
    • Left Brained VS Right Brained
      • Synthetic vs Analytical Thinking
    • Homeschool Scheduling
    • Resources for mom – Classroom management, organization, planning, ID cards, testing
    • Games to Supplement Homeschool
    • Homeschooling in Texas (Field Trips, Groups, Co-ops, Etc)
    • Adding beauty to your homeschool
    • Mom Beauty – Schole
    • Homeschool Facts
  • Gardening Basics

Category Archives: Helpful Blog Posts (Technique/Crochet info)

How to make a basic beanie for any size, using any stitch WITHOUT a pattern!

Posted on October 20, 2015 by articlesofadomesticgoddess

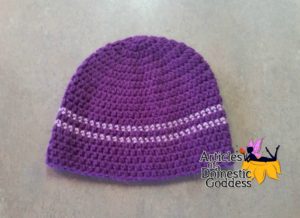
How to make a Beanie Articles of a Domestic Goddess

Make a Beanie in ANY size, in ANY stitch WITHOUT a pattern!

Have a pattern for a basic beanie for a toddler but it uses single crochet, only you really want to save time and use double crochet? Have one for an adult, but you want to make it in another size using the same stitch? What about patterns that run small, or it’s for an adult size and you want to edit the pattern to suit your needs? This can be done easily and without fuss or worry!
I used to worry a lot when I was faced with something like this. I would frequently use two or three patterns to suit my needs if I knew a pattern ran small or if I wanted another stitch for a beanie. Hopefully after reading this blog you will no longer have this problem and you will be able to come back to this chart at any time and create whatever it is that you are looking to create without having to piece together 2 or 3 different patterns!

Gauge:

To begin, it would be best to have a basic understanding of gauge. This basically just means use the right size hook with the right size of yarn. To delve further into gauge you can read up here. But for this, basically, if you have a worsted weight, you will want to use anywhere from a G hook to a J hook depending on how fast you want to complete the beanie and which stitch you choose. If you choose double crochet then G or H might be better, and if you choose single crochet or half double crochet, then any size really will do. Thinner yarn = thinner hook. Thicker yarn = thicker hook. That’s basically what you need to know for this purpose though. To read more on which yarn or other commonly used materials you may need to obtain and their uses, read here.

The basic composition of a beanie

Basically, every hat or beanie begins with increases that will fit over the crown of the head. The circle will start in the middle and INCREASE until it gets to a certain width, and then you will begin to crochet evenly (one stitch in each stitch) all the way around the hat or beanie until the hat or beanie is the length that you wish. It really is that simple. But when do you stop increasing? How do you know how long it needs to be? How do you change the stitch? If you don’t want the hassle of making your beanies from scratch and you’d like a professional service to take over the responsibilities of making your custom hats, you may want to look into a company like Imprint. The hats you order from them could be for personal use or even for branding purposes, if you own a business.

Which stitch do I use?

First, pick which stitch you would like to use. Some people like single crochet because it looks more uniform and more finished, but the downside is that it will take longer. Some people like double crochet because it works up quickly. I like half double crochet because it is the best of both worlds. Some people really dislike half double crochet. It really is preference and no matter which stitch you use, you can EASILY create a beanie in the size you wish without much planning!

How many stitches do I start with?

You can start your beanie with any number of stitches. Some people use the magic circle technique. If you know how to use that technique then that is the best method, as it closes completely without having to sew the hole up. If you’re like me, any chance I get to NOT have to sew something up, I take it! If you have not perfected that method, you can always chain two and crochet your stitches into the first chain.
I start my beanies with 8 or 9 stitches. Mostly because I memorized the 9 times tables better in school. 🙂 It also starts out flatter up top because there are more stitches. Some people start theirs with 4 or even 6. (I think even numbers are more frequent, but only because people are ocd. If you want to start with 5, then by all means go with an odd number!) A beanie that starts with 4 or 6 will be more pointed up top. You may need to do a few before you know how many you prefer.

Join or work in spirals?

This is also preference. I like to join because, well, I’m lazy. I don’t have the luxury of constant concentration on something all the time because I have children. The downside to that, is that all my beanies will have a joining seam down the back of the hat. The plus side is, I don’t have to use a stitch marker. Honestly, I could use a stitch marker and not have to worry either. It’s just how I learned though. Either way you decide is fine. A beanie worked in spirals will not have a seam at all, anywhere on it. Which is ideal. I will write these instructions under the impression that we will be working with a join because I think that is a more common choice, but if you have decided to work with a spiral, just ignore where it says “join” and “work a turning chain”. If you need help deciding, or would like to know techniques, there is more information here.

How do I increase and when do I stop?

No matter WHICH stitch you decided on, this will remain the same. You will put X amount of X kind of stitches into a circle (magic circle or the 2 chain method) and then you will join OR place a stitch marker and just work in spirals. If you joined you will need to work a turning chain. You will need to decide on that as well. You can watch these videos on turning chains to help you to decide.
Then, complete the below instructions for the desired size until it is the diameter specified in the chart below.
You may not need all the rounds listed below for your size, but they are available should you need them. Each size increases to a different width. You will increase in this fashion until the circle’s diameter (that’s measured across the widest increment across the center from the left side to the right) equals what is below in the “Diameter” column for the size that you are creating. This goes for any hat, no matter which stitch you are using to make the hat. If you’re feeling really adventurous you could mix them up! Do one round in single crochet, one in double crochet, then back post half double crochet all the way around and repeat! This makes a BEAUTIFUL beanie that gives the impression that you followed a very extravagant pattern. It really is your choice!
sizing blog hat artofadg
So if you are creating a toddler beanie, you will increase until the circle is 6 – 6.25 inches across.
Round1:
X stitches worked into a beginning round,
Round 2 :
2 stitches worked into EACH stitch,
Round 3 :
(2 stitches in the first stitch, 1 stitch in the second),
Repeat () around,
Round 4 :
(2 stitches in the first stitch, 1 stitch in the next 2 sts),
Repeat () around,
Round 5 :
(2 stitches in the first stitch, 1 stitch in the next 3 sts),
Repeat () around,
Round 6 :
(2 stitches in the first stitch, 1 stitch in the next 4 sts),
Repeat () around,
Round 7 :
(2 stitches in the first stitch, 1 stitch in the next 5 sts),
Repeat () around,
Round 8 :
(2 stitches in the first stitch, 1 stitch in the next 6 sts),
Repeat () around,
Round 9 :
(2 stitches in the first stitch, 1 stitch in the next 7 sts),
Repeat () around,
Round 10 :
(2 stitches in the first stitch, 1 stitch in the next 8 sts),
Repeat () around,
Round 11 :
(2 stitches in the first stitch, 1 stitch in the next 9 sts),
Repeat () around,
Round 12 :
(2 stitches in the first stitch, 1 stitch in the next 10 sts),
Repeat () around,
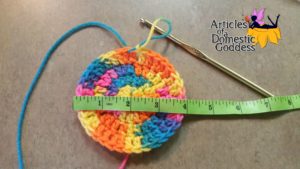
This is 9 double crochet in a magic circle with a chain 2 turning chain that does not count as the first stitch in the round. I used red heart worsted weight with an H hook. As you can see, it is about 4 inches, which would be the perfect amount of increases for a Newborn size beanie.

The basic pattern for this would look like this:
Round 1: Ch 2, 9dc in magic circle, join (9)
Round 2: Ch 2, 2 dc in each st around, join (18)
Round 3: Ch 2, (2dc, dc), Repeat () around, join (27)
Round 4: Ch 2, (2dc, dc2), Repeat () around, join (36)

For more information on crochet abbreviations see here: http://www.craftyarncouncil.com/crochet.html


How long do I make my beanie?

After you’ve created a circle with the diameter listed in the chart above for the desired size of hat you’re making, you will begin to make only ONE stitch in EACH stitch with NO increases all the way around. Super simple right!? But how long do you go to make it look right? After a few rounds you should be able to easily lay the beanie down and measure a length. Just work rounds until the beanie measures what it says in the “height” column above for your desired size. Here you can mix and match too just as before! Any combination of stitches as long as they meet the length requirement will do!
When you’re finished and you have the hat the length you want it, you may want to do a finishing round of single crochet around if you used half double crochet or double crochet. It just gives beanies a nice, finished appearance.

Congratulations! You should be able to create a beanie now, using ANY size and ANY stitch with no pattern required!


Posted in Helpful Blog Posts (Technique/Crochet info) |

How to Watermark Photos

Posted on May 12, 2015 by articlesofadomesticgoddess

In today’s day in age, if you’re posting photos online in a professional capacity, they really NEED to be watermarked with a logo. I learned this the hard way. I found that people will use your photos to show their own work. They will even take credit for your work. Don’t learn the hard way. Watermark from the beginning! It’s super easy!


1picmonkey1. Go to www.picmonkey.com


2. Click Edit on the main screen and open a photo that you would like to add a watermark to. 


3. Click the icon that looks like a butterfly on the left to go to the “overlay” screen.


4. Click the button with the words “Your own” at the top of the screen on the left to add your logo. This should be a PNG photo with a transparent background. JPG and other photo file types will not support the transparent background. Place your logo on the photo.

To create a logo with a transparent background: Create a logo with a white background in the design tab of PicMonkey. Then Save. Upload the file to LunaPic. Look under the edit tab for an option for “transparent”. Follow the instructions to make the white background transparent! Make sure to save the file as PNG. Hint: to make a JPG file a PNG file easily: open with paintbrush, then save as a png file! 


5. Save the photo!


Posted in Crochet Business Help, Helpful Blog Posts (Technique/Crochet info) |

Attaching Buttons to Yarn Items

Posted on March 25, 2015 by articlesofadomesticgoddess

At some point in time when you learn to crochet, you will need to know how to attach a button to a crocheted item.This can be used as a closure for wallets, bags or wearables. It is also frequently used as eyes or noses on character beanies and other amigurumi items.

I think the trick to securing it is tying the knot before weaving in the ends.

To learn how to weave in ends, see tutorial here

Posted in Helpful Blog Posts (Technique/Crochet info) |

How to Make Graph Paper in Excel

Posted on March 25, 2015 by articlesofadomesticgoddess

 I have found that using graph paper when drawing out graphs can be very helpful in crochet. HOWEVER, graph paper costs money, AND it can be difficult to find without going to an office store. If I can get away with going to the smaller store I will definitely do so! I also use excel to create the graphs I draw in my patterns. It looks MUCH more professional than a graph drawn in pencil and scanned in.

Here is another way to use excel to do the same thing.

Once you finish putting in your graph, you can highlight all the area of the graph and change the outline of the cells so that they show up nicely.


You can then print the pattern out onto paper, OR you can print the file to pdf.

To print to pdf: Click File –> Save As –> There will be a space for “File name” and “File Type”. Name it as you wish, but change the file type to PDF. Now you can push save and Adobe (If you do not have Adobe Reader, download it here) will open up and you will have a beautiful copy of your graph!

Posted in Helpful Blog Posts (Technique/Crochet info) |

US terms VS UK terms

Posted on November 3, 2014 by articlesofadomesticgoddess

I have a lot of followers that are overseas. I always feel bad when releasing a pattern in US terms because I know many of you have to work out in your heads the conversion and I keep thinking: “How tiring that must be!”.


Here is a chart that should help you to distinguish the differences:

uk vs us


US terms Single Crochet/UK terms Double Crochet
Insert hook into next st, yo, pull up a loop, yo, pull through both loops on hook.

US terms Half Double Crochet/UK terms Half Treble
Yo, insert hook into next st, yo, pull up a loop, yo, pull through all three loops on hook.

US terms Double Crochet/UK terms Treble
Yo, insert hook into next st, yo, pull up a loop, yo, pull through the first two loops on hook, yo, pull through two loops again.

US terms Triple/Treble Crochet/UK terms Double Treble
Yo twice, insert hook into next st, yo, pull up a loop, yo, pull through the first two loops on hook, yo, pull through two loops again, yo, pull through two loops a third time.

US terms Double Treble Crochet/UK terms Triple/Treble Treble
Yo three times, insert hook into next st, yo, pull up a loop, yo, pull through the first two loops on hook, yo, pull through two loops again, yo, pull through two loops a third time, yo pull through last two loops.

US terms Slip Stitch/UK terms Single Crochet
Insert hook into next st, yo, pull up a loop, pull the first loop you pulled up (the one closer to the hook end) through the last loop on your hook (the loop closer to the grip)


In the future I might convert my patterns to UK terminology. I know what a pain it would be for me to see a pattern using UK terminology ONLY.

If you are interested in seeing some of my patterns using UK terminology, let me know in the comments below!

If there are enough of you interested then I will consider making the changes and offering both terminologies!

Posted in Helpful Blog Posts (Technique/Crochet info) |

How to create a tassle using yarn

Posted on June 3, 2014 by articlesofadomesticgoddess

Tassels: 

Cut (15) 12 inch strands of yarn. (8 inches for child, 6 inches for toddler) Tie in center tightly. (It helps to pass the needle threaded with the end that you tied the tassel with through the center of the tassel to secure it better.)

Posted in Helpful Blog Posts (Technique/Crochet info) |

How to tie braids on an earflap beanie

Posted on June 3, 2014 by articlesofadomesticgoddess

Braids: 
Cut 6 of each color: White, Yellow and Black yarn in 24 inch strands. Fold strands in half. Weave through center of the bottom of each earflap. Thread strands from the inside out, the loose ends ending on the outside of the heat, and the folded center on the inside of the hat. Center the strands and pull center around base of earflap in slip knot fashion to fasten off. Separate colors and braid, slip knotting the ends. Hold them up to each other and tie them evenly. Cut ends to even them out.

Posted in Helpful Blog Posts (Technique/Crochet info) |

How to properly make a pom pom

Posted on June 3, 2014 by articlesofadomesticgoddess

Pom Pom: 
Wrap white yarn around three fingers 100 times for a thick pom pom. (Wrap around less fingers or more fingers for a bigger/smaller pom pom.) (Wrap 50 for thinner pom pom/150 for a very thick pom pom.) Tie double knot TIGHTLY across center. Cut through tops of loops. Trim with scissors to make even.

Posted in Helpful Blog Posts (Technique/Crochet info) |

Matching Gauge and Why it is SO Important!

Posted on May 16, 2014 by articlesofadomesticgoddess
I used to think that gauge was just a couple of numbers at the top of a pattern. I mean, my gauge MUST be close to the pattern writer’s two inches if I’m using the same size hook, right? Just how differently does Caron Simply Soft vs Red Heart Super Saver vs Red Heart Soft vs Bernat vs Vanna’s Choice work up? They’re all worsted weight after all. Here, we will explore gauge and why it is SO VERY imperative to you and your crochet projects.

The first few months that I crocheted, I never took a second glance at gauge. I skipped it. Just totally didn’t even look at it. I just got lucky that most things fit well. (And some things didn’t.) When I began checking my gauge I realized that I was WAY off on some of them. A lot of my problem then was technique. I wrote a blog on technique, how it affects gauge and how to fix it. I have come to realize that MANY people have a flaw in their technique even if they don’t see it at first glace.
Here is that BLOG. 

So let’s move on to gauge shall we? 

After I figured out my own flaws on technique, which were many 🙂  I moved on to hook and yarn. There are SO many different brands that manufacture worsted weight yarn. Guess what? They are NOT all equal. You can pretty much use any similar weighted yarn though and come to the same measurements for your project by measuring gauge.

So let’s talk about these mysterious numbers at the top of the pattern. Don’t sweat about it but DEFINITELY give it the respect it deserves and DON’T SKIP IT!

Gauge is usually written something like this:

Gauge:
With H hook:
2″ X 2″ square: 7 dc X 3 rows

What the heck does that mean anyway!? This means that the yarn you select will need to measure a 2 inch by 2 inch square after having crocheted 3 rows of dc, 7 dc across. A written out pattern for this would look something like this:

Row 1:           Ch 8, dc in third ch from the hook and across to beginning (7)
Row 2:           Ch 2, turn, dc in next st and across (7)
Row 3:           Repeat Row 2


Once you have finished your swatch, take a ruler or measuring tape and see how it came out. It should measure 2 inches from top to bottom, and 2 inches from side to side.

What if it doesn’t?

If it’s a little bit smaller than 2” X 2”, then your yarn is a little thinner than the yarn used by the pattern writer and you will need to go up a hook size and try again.

If it’s a little bit bigger than 2” X 2”, then your yarn is a little thicker than the yarn used by the pattern writer and you will need to go down a hook size and try again.

Rinse and repeat. You may have to go up or down TWO hook sizes to obtain gauge. And there is NO SHAME in doing this! I am queen of using Red Heart Soft and just using my regular old Red Heart Super Saver white with it. I go down a hook size when I start the Super Saver because it’s a little thicker than the other. No one can tell the difference.

The only thing that WILL change:

You need to look at your gauge swatch when you’re finished obtaining gauge. If you are using thinner yarn, you probably had to go up a hook size. If that’s the case, then thinner yarn + a bigger hook sometimes means that the piece will be airier than the original in the pattern. For bags, purses, or sweaters this might not be ideal. You may want to find a more comparable yarn.

Likewise, if you’re using a thicker yarn, you probably had to go down a hook size. If that’s the case then thicker yarn + a smaller hook sometimes means that the piece will be tightly crocheted with no airiness to it at all. Lacy patterns such as some lacy scarves, baby dresses, etc done in a 3 weight or Red Heart Soft or Caron Simply Soft probably won’t look the same if using Red Heart Super Saver and you may want to find a more comparable yarn.

Caron Simply Soft: is weird. lol There is no other way to say it. It says it is a worsted weight yarn, but it works up the same as a 3 weight yarn. In my personal opinion, it is NOT interchangeable with most other worsted weight yarns. (It also snags like crazy!) For things like lacy scarves though and baby dresses done in a 3 though, this would do lovely 🙂 Just match gauge! 🙂


What if I want to use a thinner/thicker yarn on purpose?

There are quite a few reasons you might want to do this. It might be that this particular yarn that you want to use is just what you have on hand. It might be that you WANT to change the look of an item to be more airy. I say go for it! There is no way to know unless you try it. As a matter of fact, a project looks completely different if done in thicker/thinner yarn sometimes. Just match gauge. I have actually done this more recently for my amigurumi that I want to come out a tad smaller. Instead of Red Heart Super Saver, I use Red Heart Soft. Or if I want it a lot smaller, I have been using Caron Simply Soft. For ami’s gauge doesn’t matter as much because it’s not a fitted item. Just note that your safety eye to full body ratio may change slightly. You want the eyes to look normal, not out of place, you may also need to go down a size on eyes.

More Misc Notes on Gauge

Gauge can be written in the round or in rows and is usually 1, 2, or 4 inches square or round depending on the pattern you’re completing.

DO NOT:  
Do not crochet tighter or more loosely to match gauge unless you plan to crochet that way for the entire piece. The yarn should slide effortlessly on the hook neck but tension should be moderately tight. Just crochet how you feel comfortable crocheting, because trust me, you’re going to revert back to what feels normal to you, especially if you put down and pick up your project. Save yourself the headache and go up or down a hook size.

Gauge is not the same after finishing one row of the swatch as it is after finishing all three rows required. Do not crochet one row, measure across, get a height measurement and do math and guess that it will be the right size when it comes out. As a matter of fact, if you’re getting 2 inches across after the first row, once you get to the third row, your gauge across will be too small. Gauge swatches are not the big and don’t take that long and they are worth checking.

What if your gauge swatch matches 2 inches across, but not 2 inches up and down, or visa versa?

You may not EVEN realize that you do it. But the method that you hold, use and maneuver the yarn may be altering your gauge swatch. You would benefit greatly from my other blog post about technique. I myself had a technique problem that I recently corrected and it changed the way I crocheted forever! Take a moment and explore technique with me, even if you don’t think you are doing it wrong: Technique Blog

I would be happy to help anyone in need of it. If you have a problem with gauge or technique, I can try to help you pinpoint the areas that need work. I wish I had someone to ask questions to when I first started. And while I’m by no means advanced and I may not know the answer to your question, I’ll find someone who does. 🙂 Happy hooking you marvelous ladies!

Posted in Helpful Blog Posts (Technique/Crochet info) |

Amigurimi Technique that will always work and will change the way you crochet FOREVER!

Posted on April 1, 2014 by articlesofadomesticgoddess
Are you a Lifter, Rider or a Yanker?


I have been trying to explain to my sister in law, who also crochets, why our gauges seldom match. I have carpal tunnel, so I have always said that I crochet loosely to compensate. My sister in law, crochets tightly. I had thought that’s just what it was, she must clutch her yarn ridiculously tight to get that stitch that tight! Lately, we’ve become more comparable in our gauge swatches. That is because I’ve begun to do amigurumi and I’ve changed the technique that I have been using to complete stitches. Getting the stitches tight enough so that the stuffing did not show through for me has been a struggle, but the reason I started crocheting is because I was intrigued by amigurumi. Call me a weirdo, but I want to crochet eggs and bacon and toast on a plate. What am I going to use it for?? I have no earthly idea, but it’s interesting to me lol Only to find once I started crocheting that it was impossible for me! One day though, it just clicked! My stitches didn’t need to become tighter. No matter what I did using the same technique, it was going to be the same, just tighter, and my hands were going to ache because I was doing it wrong. By changing my technique, I was able to perfect amigurumi and my hands never ached.

Most amigurumi are done using single crochet. After putting your hook through the next stitch in your row, yarning over and pulling through, you will have two loops on your hook. Those loops get tighter or more loose depending on the way you complete your next yarn over and pull through to complete the single crochet stitch. Here’s what I noticed that I did incorrectly after my first yarn over and pull through of the single crochet stitch: When I crochet normally, the loop at the front of my hook, closer to the hook, somehow got to be double the size of the other loop, which made my STITCHES too large. I have learned recently that this is called being a “lifter” and that I was lifting the front loop up to be the same height as the back loop. When doing amis, once the stitch was completed, I would then yank on my tension yarn to make my tension tighter to accommodate for crocheting loosely. Or, what I thought at the time was crocheting loosely. Which made me a lifter AND a what is called a “yanker”! It’s not that I crocheted any more loosely than my sister in law. It’s just that I made my stitches differently. Tension had little to nothing to do with it.

The trick to making an amigurumi successfully is: If you tilt your hook up at the back end instead of pulling straight to the side, when completing the last yarn over and pull through of your single crochet stitch, those loops left on the hook never get any bigger. This is called riding the stitch. Those that are “riders” don’t have any more undue stress on their hands than lifters do, which is what I desperately needed to avoid, having carpal tunnel. And they also are able to match gauge more closely than someone who is a lifter or a yanker, like me.

However, you can also do your stitches too close to the stitches below them, by holding your tension TOO tightly, or yanking on the tension yarn to get your tension as tight as you think it has to be, which is what I found that I did when trying to crochet more tightly. And then any stitch in subsequent rounds is going to be a terror on your hands trying to get the hook and yarn through. Your yarn’s going to snag… and the stuffing still will show through because you’ve crocheted so tightly. If you’re having trouble putting your hook into the stitch below it might be indicative that you are yanking on your tension yarn. If you’re like me then you don’t even know you do this.

I thought I had an “a-ha” moment that no one had had before. I didn’t realize there were names for the different techniques for completing the stitches, I just knew that in order to complete an ami correctly I had to tilt up my hook at the end when completing my stitch so as to keep the two loops the same size and that if I DID this, I would then not feel the need to yank on my tension yarn to get it tight enough to start my next stitch. This has slowly moved over into my other non-ami projects and has changed the way that I crochet forever. I hope it has for you as well!

Below is a video from Crochet Ever After that has helped me to visualize the different stitch techniques. She also tells you how to change these habits.

Crochet Ever After – Lifter/Rider/Yanker video

********************
Articles of a Domestic Goddess                                                                                   

Visit us on Facebook
View our Etsy shop
Pinterest Boards

Ravelry Store Front

********************

Posted in Helpful Blog Posts (Technique/Crochet info) |
Next Page »

Newsletter

Ravelry Store Articles of a Domestic Goddess

Ravelry Articles of a Domestic Goddess
Ravelry Store Articles of a Domestic Goddess

Find us on Social Media

  • Pinterest
  • Twitter
  • Facebook

HDC Stitch

https://www.youtube.com/watch?v=jkXwVFPQN5c

Recent Posts

  • Ways to Feed Your Soul March 4, 2019
  • Simple Charity Big Baby Hat (3-6 and 6-12) September 8, 2016
  • Simple Charity Teen to Large Adult Hat September 8, 2016
  • Summer Getaway Bottle Cozies August 15, 2016
  • Simple Charity NB Booties August 15, 2016
  • Simple Charity Toddler/Child Hat August 1, 2016
  • Cosmopolitan 6 Inch Granny Square June 7, 2016
  • Key Lanyards for Teacher or Nurse May 27, 2016
  • Simple Charity Baby Hat May 27, 2016
  • First Live Video – Package Unveiling 5/27/16 May 27, 2016
  • Thread Bookmark, Ornament or Motif May 1, 2016
  • Spring Fever Crochet Pattern Round-up April 5, 2016
  • A Designers Potpourri Crochet-A-Long pattern release! January 16, 2016
  • How to make a basic beanie for any size, using any stitch WITHOUT a pattern! October 20, 2015
  • NB Baby Mittens August 31, 2015

Contact Donna Knox

  • Email
    donna.knox84@yahoo.com
  • Phone
    832-287-9554
  • Address
    1322 Foley Rd Crosby Texas 77532

Archives

  • March 2019
  • September 2016
  • August 2016
  • June 2016
  • May 2016
  • April 2016
  • January 2016
  • October 2015
  • August 2015
  • July 2015
  • May 2015
  • April 2015
  • March 2015
  • February 2015
  • January 2015
  • December 2014
  • November 2014
  • October 2014
  • September 2014
  • August 2014
  • July 2014
  • June 2014
  • May 2014
  • April 2014
  • March 2014
  • February 2014
  • January 2014

Login

  • Log in
  • Entries feed
  • Comments feed
  • WordPress.org

CyberChimps WordPress Themes

© Articles of a Domestic Goddess